04 - Conditionals
So we know how to code some absolute basic movement. But we built all of that based conveniently on the Sin() function. Also, it will always run, we have no way of interacting with it.
What if we could do things based on some condition? Let’s say you press a button, move the mouse or tilt your phone?
This is where “Conditionals” come in. Conditionals will manage how your code will “flow”, and they belong to a group of programming ideas that people refer to as “Control Flow”. Conditionals in their widest used form come as “if-else” statements. The idea is to run code if we meet a certain condition - a.k.a “true”. You can then have a statement that defines what happens if the condition turns out not to be true, but that’s not a hard requirement.
if(true){
	// This Code would run
}
if (false){
	// This code would not run
}
As you can see, the syntax for this is straightforward. You start out with a simple if put true or false in parentheses and add your code in curly braces.
While this is perfectly valid code, it’s also nonsensical. The first condition is true and will always be true while the second piece of code will never run. That makes no sense at all!
To make sense of this, we need to introduce a new data type: The boolean. Exactly like floats or integers, you can create variables for booleans and do “calculations” with them. Yet these calculations need to return true or false. Here are some example:
bool myBool = 2 > 1; //returns True;
bool myOtherBool = 2 < 1; //returns False;
You can use a these operators to evaluate conditions:
> greater than
< smaller than
>= greater or equal
<= smaller or equal
== is equal to
!= not equal to
While these are straightforward I want to point your attention shortly to the “is equal to” operator. It uses double equals. As you know, we have single equals in use to assign values to variables, thus we use double equals for comparison.
Using boolean variables or expressions in the parentheses, we can make these “if statements” useful. For example, we could check if the sinus value on our moving cuboids is negative and then inverse it into a positive number:
if (sinus < 0){
	sinus  = sinus *-1;
}
In the above code the expression sinus < 0 would test to a boolean of either true or false. Leading to a bouncing motion of the cuboids. We mirror the negative values of sinus into positive values.

Mirrored X Animation
“If-statements” also come in two more variants: “If - else” and “If - if else - else”. The idea behind these should be clear from the naming itself, but let’s explore them. While a single “if-statement” will just return to the main-body of code if the condition isn’t met, an else statement will execute another piece of code. Think of an amusement park ride. You are tall enough and can enter or you are too short and will be sent away. The staff member would have this decision pattern:
bool isAllowedOnRide;
float height = 150; // in cm
if (height >= 150){
	isAllowedOnRide = true;
	Debug.Log("You are tall enough. Enjoy the ride.");
}else{
	isAllowedOnRide = false;
	Debug.Log("You are too small, kid. Sorry...);
}
This code would make sure either of both blocks is run.
The last option are If - else if- else statements, in which you could have as many else ifs as you like. An example could be a code that checks which team won in a football match, or if the match ended in a tie.
int TeamAGoals = 2;
int TeamBGoals = 0;
if (TeamAGoals > TeamBGoals){
	DebugLog("Team A Wins!");
}else if (TeamBGoals > TeamAGoals){
	Debug.Log("Team B Wins");
} else {
	Debug.Log("Tie!");
}
We can make use of these in our Homage to decide for one approach or another using these statements.
Based on a boolean we promoted to the editor, we can offset the bouncing direction.
using UnityEngine;
public class ConditionalCuboidsShiftingXZAppartSimple : MonoBehaviour
{
    [SerializeField]
    private float timeOffset = 0;
    [SerializeField]
    private float movementScale = 0.25f;
    [SerializeField]
    private bool inverted;
    void Update()
    {
        float sinus = Mathf.Sin(Time.time + timeOffset);
        sinus = sinus * -1;
        sinus *= movementScale;
        if (inverted)
        {
            transform.position = new Vector3(transform.position.x, transform.position.y, sinus);
        }
        else
        {
            transform.position = new Vector3(sinus, transform.position.y, transform.position.z);
        }
    }
}
Here we promote a boolean to the Unity Editor. Booleans will show up as check boxes. So now we can select in the Editor the Cuboids we want to move along another axis. An example could look like this:

Cuboids shifting on either X or Z
Getting User Input
As Unity is in its core a game engine, one of its core features is to do something based on User Input. Every game needs this way of interaction. Unity offers a variety of Inputs. You can check if a button is pressed and get a pulse like answer, or a continuous answer while pressing the button down. These Inputs will provide you with a simple true or false answer. For more complex input methods like game controllers and joysticks, you can receive their current values. You can even grab values like touches and orientation from mobile devices.
The most basic Input we can get is “anyKey”.
if (Input.anyKey)
{
    transform.position = new Vector3(transform.position.x, sinus,transform.position.z);
}
Input.anyKey will return true as long as it receives any Input. And while it’s fine for our purpose, there really aren’t that many practical uses to anyKey. Most likely you will want to check for a specific key. To ask for these, you also need to choose what kind of event you are interested in. Here are the basic methods to use:
GetKey() - Returns true while Key is pressed.
GetKeyDown() - Returns true the moment the Key is pressed down
GetKeyUp() - Returns true the moment the button is released
You will also need to specify the Key you want to check using “KeyCodes”:
if (Input.GetKeyDown(KeyCode.A){
	Debug.Log("'A' was pressed");
}
To decide for a Key we want to check for we use “KeyCodes”. You can pass them in the parentheses. KeyCode.A will check for the “A” Key on the Keyboard. KeyCode.B will check for the “B” Key on the keyboard and so on. Some of these KeyCodes can be a little unintuitive. I.e. checking for KeyCode.1 won’t work. Specify KeyCode.Alpha1. “Alpha” for Alphanumerical. If you can’t seem to find the key you are looking for with the help of your IDE, check your go to search engine.

Cuboids Shifting on Keypress
Delta Time
Look back at the example above. That code works fine, but we also kind of introduced a bug into our code. The moment we press the “A” Key, all our squares jump and then keep moving. A more pleasing result would be to have them starting off where we stopped them when releasing the button before. So let’s think about our code. Where exactly does the movement come from?
The movement is ingrained in our usage of time as a variable. Even worse. It is using System time, and that’s really a place where we we can’t and don’t want to stop time!
We need to create our own way of advancing time. We can do that with a simple float variable.
private float timePressed = 0;We could go ahead ad add an arbitrary small value to our variable each frame. And we would get a smooth Animation. This would work fine as long as our machine maintains a constant frame rate. By default it is limited to 60 Frames per Second. So worst case, we would get a slower animation on slower computers. But we could disable this upper Limit and on newer computers it could easily run several times faster.
This is actually a very common problem in 3D engines. The solution programmers came up with is deltaTime. DeltaTime is the time it took to render the last frame. If you add the deltaTime of each frame over the time frame of a second, you should end up with more or less a second. By all means this isn’t perfect, but it’s as good as it gets. And as long as your computer doesn’t have any hiccups, this will be fine.
if (Input.GetKey(KeyCode.A))
{
    timePressed += Time.deltaTime;
}
Now you can use timePressed instead of Time.time in your sin-Function. And the Animation should continue where it left of when you press the key.
Much Better!
Here is the full code for that:
using UnityEngine;
public class ConditionalCuboidsShiftingXAKeyDeltaTime : MonoBehaviour
{
    [SerializeField]
    private float timeOffset = 0;
    [SerializeField]
    private float movementScale = 0.25f;
    [SerializeField]
    private float timePressed = 0;
    void Update()
    {
        float sinus = Mathf.Sin(timePressed + timeOffset);
        if (sinus < 0)
        {
            sinus = sinus * -1;
        }
        sinus *= movementScale;
        if (Input.GetKey(KeyCode.A))
        {
            transform.position = new Vector3(sinus - 0.25f, transform.position.y, transform.position.z);
            timePressed += Time.deltaTime;
        }
    }
}
Input Manager
All the above will pretty much only get us access to keys on the Keyboard. What about controllers and mouse input? For these Unity provides the very convenient Input Manager. It allows you to ask for named input like “Jump” or “Horizontal”. Multiple buttons can then control a single axis. If you are familiar with video games, you might have seen that you can control a car with “WASD” and the arrow keys. In Unity the “horizontal” input will by default react to the “left/right” arrow keys as well as “A” and “D”. It will even react to joystick input from a controller.
This last option leads to a different behavior. It’s not enough to return a boolean for the horizontal axis, because there are more states to consider then on/off on a joystick. We have to at least consider three: Left, Right and No Input. To represent this, values will typically be in between -1 and 1. Negative values corresponding to left and positive value corresponding to right.
To see which values Unity accepts and how it interprets them you need to check the Input panel in the Player Settings: “Edit —> Player Settings —> Input”.
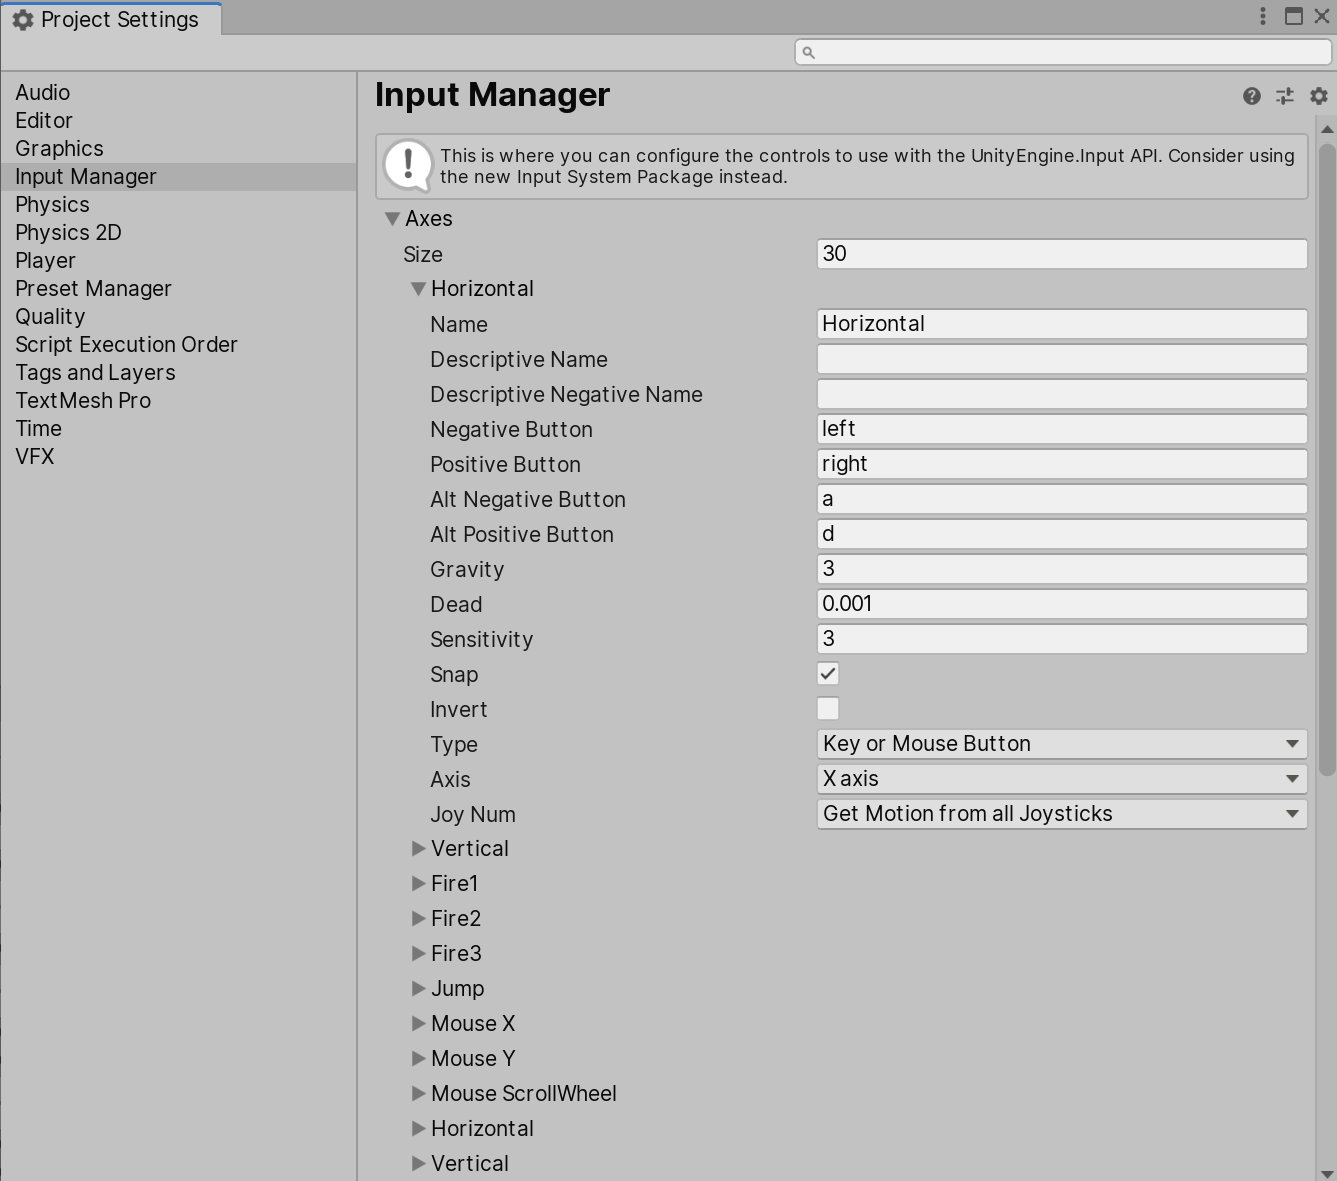
The Unity Input Manager
If you pop open one of the Axis, you can see which buttons are mapped to the axis, and the name connected with it. The name is what you would eventually use in your code to access them:
float movementDirection = Input.GetAxis("Horizontal");Mouse Input
As I can’t assume you have a game controller laying about, let’s play with mouse Input. Mouse Input is special in a way: You have to somehow deal with mouse movement speed.
Thus the Input from “Mouse X” and “Mouse Y” will be the mouse delta, or the distance it traveled during the last frame. We could this create a variant that’s based on the overall speed of our mouse!

Movement based on MouseSpeed
public class ConditionalCuboidsPoppingMouseSpeed : MonoBehaviour
{
    [SerializeField]
    private float movementSpeed = 0.01f;
    [SerializeField]
    private float movement = 0f;
    [SerializeField]
    private float bounds = .5f +.1125f;
    void Update()
    {
        movement = Input.GetAxis("Mouse X") + Input.GetAxis("Mouse Y");
        movement *= movementSpeed;
        transform.Translate(0, movement, 0);
        if (transform.position.y > bounds)
        {
            transform.position -= Vector3.up * 1.1125f;
        }
        else if(transform.position.y < -bounds)
        {
            transform.position += Vector3.up * 1.1125f;
        }
        movement = 0f;
    }
}
New Input System
The folks at Unity are working on an alternative Input System, that remedies some problems of the current one. This should most likely not concern you too much, but if you think of working on something that needs crazy input options, look at that!
Projects
Project 1
Your most obvious choice should be to create more Cuboids! At least I did.
Can you think of a way to recreate these? What would your steps be? The first two should be easy, but how would you solve the last one? Try these yourself before you peek at the code!

ConditionalCuboidsShiftingXZSwitch

ConditionalCuboidsPopping.cs

ConditionalCuboidsBouncingBall.cs
Project 2
Flyable Spaceship

In this sketch we will reuse our spaceship and make it actually flyable. You should know everything to realize this yourself by now. But let’s go through this in theory and below I will also give you the code and the link to the last scene as an assetpack.
So what do we need to check here? We need to check for user input for acceleration and deceleration. You could either check for hard-coded Keys our use the Input Manager and as for the vertical axis. And if there is user input, you will need to translate your spaceship.
Do the same for rotation of the spaceship.
In the same script, you should also check for the bounds of your sketch. This will be totally up to you how you define these, I just went ahead and just moved the spaceship around in the viewport and used the value as bound, when the spaceship isn’t visible anymore.
Based on these bounds, you can set the value to the exact opposite on the same axis.
As additional things to play with, you could add the flames only when the spaceship is speeding up or rotating. And you can add a planet which passes in the background repeatedly.
You could also limit the maximum speed or add more planets in the background. Feel free to make it completely your own.
Spaceship Script:
FlyController.cs
Flames Script:
FireController.cs
Planet Script: