05 - Methods
In this chapter, we will discuss methods. We have been using them for a while now, without mentioning them. Methods are a collection of statements that do exactly one thing - or at least they should only do one thing. The Update() method updates all the things you define each frame. The Start() method sets things up in the beginning.
Creating or “defining” our own functions will do a lot for us. For one, it will help us avoid repetition in our code. This will also lead to more readable code. You might have noticed that some scripts have become rather confusing. Methods are a brilliant way to bring back some order. Methods can also take in arguments. These can change the behavior or output of the method.
Methods vs. Functions
Many other programming languages call methods “functions”. Many programmers started out in another language and still use the name function when they refer to C#. But they are the same thing and I can’t guarantee that I won’t slip up at one point and use function here or there.
Defining methods
To define a very simple method, we need to define two things: a “return type” and a name for our method. The most basic return type is void. Meaning: You don’t expect to get something returned back to you. That is why our Update() and Start() methods use void as a return type. They just do their thing. Methods that typically have a return type are math operations, like the Sin() function we have been using. We provided the current time and got the sinus of the time value in return. Let’s look at some examples.
void TimeLogger(){
    Debug.Log(Time.time);
}
This code defines a function that returns nothing but prints the current time to the console. Defining the method does not call it. This alone will never be executed.
But now you can call this method at any point in your code, in the same script. Calling a method is as simple as using its name with parentheses but without the return type keyword. So let’s look at a whole script for this:
using UnityEngine;
public class LogTime: MonoBehaviour
{
    void Update()
    {
        TimeLogger();
    }
    void TimeLogger()
    {
        Debug.Log( "The current timestamp is:" + Time.time);
    }
}
As you can see, we define new methods at the same level as the Start() and Update() method. You can define them below or above the line in which you call them. Actually, we are defining the Start() and Update() methods in each script. The only difference between our methods and the Start() and Update() method is, that Unity will call them automatically during execution. For our own methods we are responsible for calling them.
So how can a simple void method help us with our code? As an example, let’s go back to the “Popping” cuboids from Chapter 04:

public class ConditionalCuboidsPopping : MonoBehaviour
{
    [SerializeField]
    private float movementSpeed = 0.25f;
    [SerializeField]
    private float bounds = .5f;
    void Update()
    {
        transform.Translate(0, movementSpeed, 0);
        if (transform.position.y > bounds +.225f)
        {
            transform.position = Vector3.up * -bounds;
        }
    }
}
While our Update() method is still reasonable in this case, to understand what is going on, we still have to read through “low level” code. We can clean this up by using methods. What is the line transform.Translate(0, movementSpeed, 0); doing? It’s moving the cuboid up. So let’s create a method for it.
    void MoveCuboidUp()
    {
        transform.Translate(0, movementSpeed, 0);
    }
Now we can replace the original line with a call to this function:
public class ConditionalCuboidsPoppingRefactored: MonoBehaviour
{
    [SerializeField]
    private float movementSpeed = 0.25f;
    [SerializeField]
    private float bounds = .5f;
    void Update()
    {
        MoveCuboidUp();
        if (transform.position.y > bounds +.225f)
        {
            transform.position = Vector3.up * -bounds;
        }
    }
    void MoveCuboidUp()
    {
        transform.Translate(0, movementSpeed, 0);
    }
}
What we are doing right now is called “refactoring”. We are restructuring and often simplifying or de-cluttering our code without changing what it does. Whenever you feel you are done with a script, consider if there is any useful refactoring to be done. We haven’t done it so far, because we were missing the proper tools. But doing this helps you to create a beautiful and easy to maintain code base.
So while we are at it? What more can we do? We have a part left where we check for the position and based on that pop the cuboid back down. We could put in a method called CheckBoundsAndPopDown. But wait! Didn’t we establish in the beginning that methods should only do one thing? They should!
So let’s split both of them. Easy things first:
    void PopCuboidDown()
    {
        transform.position = Vector3.up * -bounds;
    }
Now all the methods we have been declaring so far just did things. But how can we simplify the if-statement further? It needs a boolean of true or false to evaluate. This where return types come in. We can make our method return either true or false like this:
    bool CheckYGreaterBounds()
    {
        return transform.position.y > bounds + .225f;
    }
Instead of void we define the type we want to return. It’s bool in our case, but could be anything. Then we need to make sure our method contains a return statement followed by the value we want to return. In the upper code we just rely on the evaluation of the statement to return either true or false. With this done, let’s look at our Update() method.
    void Update()
    {
        MoveCuboidUp();
        if (CheckYGreaterBounds())
        {
            PopCuboidDown();
        }
    }
Isn’t it a beauty? Consider coming back to this script in two weeks or a month. Checking Update() you easily understand what is going on in the script. You don’t have to work through each line to understand what the whole script is doing. Why would you care how something is moving up or popping down? Or say, you need to change how the cuboid is moving up, you only need to check method MoveCuboidUp() and not all the code in the Update() method.
Refactoring Tricks
Assuming you are using the “Visual Studio Community” Edition that comes bundled with Unity, you can access a shortcut in the IDE. If you select a line or multiple lines of code you want to refactor into a new method, you can press
Ctrl + .. VS Community will then ask you if you want to “Extract method”. Pressenterand a new method including your code will be created. Also, you can now input a name for the method. The method call will adjust accordingly.
Method Arguments
The last thing we need to concern ourselves with regarding methods are parameters and arguments. Parameters allow you to “pass” information to the method. We call this information an argument. You’ll see quite a few people using both things interchangeably.
A very simple definition and call could look like this:
int Add(int a, int b){//. . . }To add parameters to a method, we declare the type for each parameter – an integer in this case – and a name for the parameter in the parentheses we left empty until now.
In the method itself, you can use these like normal variables. These are only visible to the method, and you can’t use these variables outside the context of the method.
int Add(int a, int b){
	return a + b;
}
To pass information, you add arguments to the function call. Here, this could be literal numbers or any variables that contain an integer. Important is, you have to specify all arguments. You can’t just specify a single integer in parentheses.
int result = Add(1, 1); // returns 2The method we created is rather pointless, but I hope it clarified the basic idea. Let’s look at a more advanced example:
While this is the Popping example from before, I introduced some fading towards the bounds. Let’s first look at the beginning of the script:
using UnityEngine;
public class ConditionalCuboidsFading : MonoBehaviour
{
    [SerializeField]
    private float movementSpeed = 0.25f;
    [SerializeField]
    private float bounds = .5f;
    [SerializeField]
    private Color colorToSet;
    private void Start()
    {
        colorToSet = GetComponent<Renderer>().material.color;
    }
    void Update()
    {
        MoveCuboidUp();
        if (CheckYGreaterBounds())
        {
            PopCuboidDown();
        }
        if (transform.position.y < 0)
        {
            colorToSet.a = Map(transform.position.y, -.45f, -.0f, 0, 1);
        }
        else if (transform.position.y > 0)
        {
            colorToSet.a = Map(transform.position.y, .225f, .45f, 1, 0);
        }
        GetComponent<Renderer>().material.color = colorToSet;
    }
...Start() we store in it the color, we have currently defined in the Unity editor. This allows us to conveniently set the colors on the Unity Editor still. We need to do this because we can’t seperatly set the alpha value of a color on the material. We can though set the alpha value separately on our variable. Thus the last thing we do in Update() is to update the color on our material as a whole. Including the change in alpha value.
In between we run our movement code and also change the alpha value of our color variable based on the Y axis position. ColorToSet.a accesses the alpha component. What do we set it to? We call the Map() method and pass it five values. So let’s look at the Map() method.
    float Map(float value, float oldMin, float oldMax, float newMin, float newMax)
    {
        float oldAbs = value - oldMin;
        float oldMaxAbs = oldMax - oldMin;
        float normal = oldAbs / oldMaxAbs;
        float newMaxAbs = newMax - newMin;
        float newAbs = newMaxAbs * normal;
        float clampedNew = Mathf.Clamp01(newAbs + newMin);
        return clampedNew;
    }
The Map() method takes in a key float value and values for two ranges. With it, you can transfer values from one range to the other. In our example, we have a range between 0.225 for the Upper Mid Cuboid and 0.45 for the Upper Cuboid. During this range we want to fade out the cuboid. But the Alpha values range from 0 to 1. Using this method, we can easily convert between them.
Imagine having all this in your code each time we call the Map() method. And yes, we surely could shorten this code. We not only shortened our code, but we also made sure we didn’t repeat ourselves. If we now have a problem with this mapping, we can then easily work through this method. Fixing this problem will fix all the problems with mapping.
The Map method is based on this interesting discussion on the Unity Forums.
Magic Numbers
In this example, you see me using some actual numbers/values as parameters. e.g.:
colorToSet.a = Map(transform.position.y, -.45f, -.0f, 0, 1);Those are “magic numbers”. Numbers in the code that magically define how something works. Going through code and finding the place where someone multiplied a value by 2 can be daunting. You typically should avoid them at all costs. Create a variable for them! Magic numbers can be a genuine pain to debug, especially if you come back to code later.
I left them, so I could make this point. You should not.
Colors in Unity
Everything we are designing in Unity right now is supposed to be displayed on a screen. Screens, in contrast to printed imagery, emit light. Adding red, green and blue light in the correct proportions will give you white light. We thus talk about additive color. Every pixel on your screen comprises these three colors. Mixing these three components together will give us a very wide range of perceptible colors to display. For example, mixing Red and Green will give you Yellow. Blue and Green will result in Cyan.
While this concept is very nice for computers to understand, we rarely talk about color in terms of a combination of red, green and blue.
“The suspect wore a 50% red, 50% green and 100% blue sweater.”
Yeah, we don’t do that. We say:
“The suspect wore a light blue sweater.”
Another way to talk about color is “HSL”/“HSV”: Hue, Saturation and Lightness/Value. Now we can define a hue around the color wheel, the saturation and its lightness or brightness. From a programming point of view, it also makes some color manipulations easier, because we can manipulate the more “human readable” components directly.
Color is its own type in Unity. This means colors need to be created using the new Keyword. The arguments we can pass to the constructor are red, green, blue, and an optional alpha value. The values you need to supply the method will be floats ranging between 0 and 1. It will clamp every value beyond 1 at 1.
Color myRed = new Color(1,0,0); // This would be pure red
Color myGreen = new Color(0,1,0); // This would be pure green
Color myBlue = new Color(0,0,1); // This would be pure green;
Color myTransparent = new Color(.5f, .5f, .5f, .5f); // This would be a transparent middle gray
Unity comes with some static colors, which you can use for convenience. Color.black for example, could quickly define a default value.
Given this, working with colors is pretty much straightforward. A little awkward is assigning the colors to an object. We need to access the Color Component on the Material Component on the Renderer Component on our object. It’s a lengthy line of code for just a small assignment, and it looks like this:
GetComponent<Renderer>().material.color = new Color(1,0,0);While we can now change the color, we can just set RGB values. How about we try to create a little more flexibility?
Luckily Unity provides us with some Methods to retrieve or set colors differently using the Hue, Saturation and Value approach.
Setting HSV Colors works very similar to creating Colors using the RGBA approach. Instead of red, green and blue, we define values for hue, saturation and value as floats.
Color myColor = Color.HSVToRGB(0,1,1);
In this example we set color using “hard” values again. More interesting would be to manipulate colors. Unity does not provide a way to do this out of the box. But we can build our own manipulation tools!
float h,s,v;
Color currentColor = GetComponent<Renderer>().material.color;
Color.RGBToHSV(currentColor, out h, out s, out v);
h += 0.05f;
if(h > 1){
	h - 1;
}
GetComponent<Renderer>().material.color = Color.HSVToRGB(h,s,v);
The code uses some syntax we haven’t seen so far and yet it is rather straightforward. First, we need to declare variables for hue, saturation, and value. As you can see, we can do the declaration in one line. All of them will handle values between 0 and 1 and thus we define these as floats. Then we create a variable for our current color of the GameObject and retrieve it.
Next we use a “static” method on the color class which we pass the current color and tell it to which variables it should assign the three HSV values using the out keyword. We need the out keyword if we want to retrieve more than one value from a method.
With those now assigned, we can manipulate one of those values. Here we choose Hue to shift the color around the color wheel. We also add a condition to check if we surpass 1, and if so, we subtract 1 to make sure we start on the other side of the color wheel again.
Finally, we construct a new color from hue, saturation and value and assign it back to our cuboid.

Cuboids Shifting on the X Axis
In the above example, you can see this working on button press. You can see this works relatively fine for monochromatic color schemes. You will find that this approach won’t look as good using other color schemes. But try it!
Here is the full code:
ConditionalCuboids_Shifting_ColorShift.cs
Color Math
Unity also allows for doing basic math operations between Colors. The following Code would give you magenta.
Color myColor = Color.Red + Color.Blue;Color math is actually just Vector Math. And Vector Math is nothing else as separating the components and dealing with red, green and blue one at a time.
Gradients

Cuboids shifting, fading and evaluating a Gradient
Another pleasing way to work with colors are gradients. While you could define your gradients through code, we will just look at defining them in the editor and then using them at runtime. While this is like shifting colors around, it will also give us more artistic control, which is always good.
To create a gradient, we declare it as a variable of type Gradient.
[SerializeField]
private Gradient popGradient = new Gradient();
We can now create our gradient inside Unity by clicking on the white color bar in the editor.
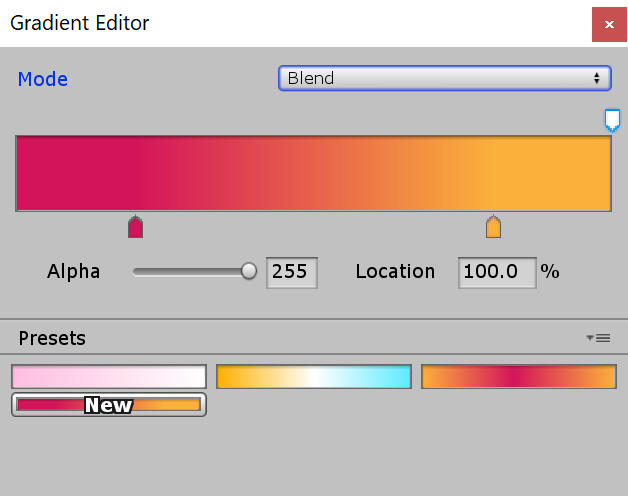
Gradient Tool in Unity
On the “Gradient” pop-up window, you can define the gradient by adding new colors on the bottom bar and alpha values on the top bar. In this sketch, I calculated and added alpha separately.
In code, we can then evaluate the color at a position between 0 and 1 or left to right.
Color curGradientColor = popGradient.Evaluate(transform.position.y + 0.45f);As you can see, any value can be used to evaluate this. For this sketch, the position in Y works fine.
You can see the full code here:
MethodCuboidsFadingWithGradient.cs
Randomness and Noise
Noise and randomness are two key ingredients in creating generative art. They allow you to create ever developing and always changing things. Depending on the depths of layering you create, these will virtually never repeat. Randomness and noise both serve different purposes.
Randomness will generate random values each time you call the method. Randomness has no concept of the previous value or any connection to it. All it knows about is the range in which it is to generate values.
Noise is related to randomness as it returns different values over time. Yet these are not random, they have a pattern and will repeat with time. Noise is great, because it’s very flexible. You can configure it to throw values that seem almost random, yet it can also return very smooth values. Here is a simple comparison of the two:

Randomness and noise
But noise and randomness can also lead to creating uninteresting and bland work. Especially Randomness. As a designer you want to have control over your work and it’s outcome. You want to control the randomness to make use of its power and yet never bend to its rules.
Thus to understand the problems of Randomness lets create a poor example! – Random Color:
Random Color each Frame
MethodCuboidsShiftingRandomColor.cs
To be fair, probably no one would code this and be utterly pleased with himself. And yet creating colors or movement this way is tempting.
But! There are many great things randomness allows us to do. So let’s first look at how to get random numbers back from the computer.
float myRandom = Random.Range(0f, 1f);It’s as easy as calling the Random.Range() method and passing it two values for the minimum and maximum numbers you want to get in return. Yet there are a few Gotchas.
The Random.Range() method has a few “overloads”. Overloads allow us to define the same method multiple times. The compiler then chooses which one to use based on the arguments you pass it. And for beginners this really is a nasty trap. Look at these two lines of code:
float myFirstFloat = Random.Range(0,1);
float mySecondFloat = Random.Range(0f, 1f);
Would you expect the first and second float to return the same kind of values? Values between 0 and 1? One might think so, but no! The first Random.Range() takes in integers.
Well fine..! So The first one returns integers. It must return either 0 or 1!
Wrong again! It always returns 0.
Now you might be in a state of confusion. And that’s fair. Random.Range() for integers is not inclusive for the higher number. It’s “up to but not including 1”. If you wanted to get values between 0 and 1 you would need to pass 2 as the higher value and so forth:
int myInt = Random.Range(0,2); // Returns either 0 or 1Random.Range() for floats on the other side is inclusive, thus if you pass it 0 and 1 as floats it will include 0 and 1. But you have to make sure to put those fs in there. Technically, one would be enough, but I think this is more specific:
float myFloat = Random.Range(0f, 1f);Overloading methods
You can create these overloads for methods in your own code. Just define two or more methods with one and the same name and different numbers or types of parameters. But make sure it makes sense to create overloads. As you can see, this can lead to some confusion and thus quickly can lead to bugs.
With this technical weirdness out of the way, let us look at creating more interesting results than the color craze up there.
Randomness is bad choice to create animation, due to it’s in-continuous nature. But it is a great way to do choices. Thus we could change the color of our cuboids based on a random value. But instead of doing this with each frame and creating random colors, we can do it on condition and only choose from a certain set of colors:

Choosing random color from collection
Given, this isn’t our sweetest result so far, but it is a lot better and feels more consistent than the complete Randomness in the beginning. But we will use the concept of randomness more and more throughout the next chapters.
Noise
We established earlier how noise is different, so let us jump straight into using it.
float myNoise = Mathf.Perlin(Time.time, Time,time);As you can see the noise method is located inside the Mathf namespace and it’s called Perlin. The noise C# implements is called “Perlin Noise” which was invented by Ken Perlin in 1983. The way this noise works is, we look up a position in X and Y on a noisy black and white plane. The value of the black-to-white value is then returned as a float. This means, if you need animated noise, you need to pass values to the method that are changing over time. For example time.

Noise Shifting
What you can see here nicely is how the patterns in the noise repeat with time.
float noiseX = Mathf.PerlinNoise(Time.time * movementScale + timeOffset, Time.time + timeOffset);
float noiseZ = Mathf.PerlinNoise(Time.time * movementScale + timeOffset +.5f, Time.time + timeOffset +.5f);transform.position = new Vector3(noiseX, transform.position.y, noiseZ );
Getting this kind of animation relies on two kinds of Offsets. The first offset I put was a hard coded 0.5f for the noiseZ value. This will guarantee that the movement will not just happen along one axis.
The other offset is a custom offset per cuboid you can set in the Editor. This Offset will create the time offset you can create for the cuboids. You can play around with this value and the order in which you set the offset to create different results.
Projects
Project 1:
The first thing I suggest you do is go through the scripts you have written so far and refactor them. And for at least a few, try not to rely on the refactoring help of your IDE. Really internalize the concept of writing methods. Confidence in doing this basic things will ease the difficulty of programming down the line.
Project 2:
While methods don’t actually allow us to do something utterly new, it allows us to create things that aren’t horribly tedious to do. So here are some more examples for our cuboid: Go check them out.

ConditionalCuboidsPivot.cs

ConditionalCuboidsFourPivots.cs
Project 3:
In this project, we will use noise to let our spaceship hover and struggle over the surface of a planet. We will reuse the assets from chapter 02.

You can start with your sketch from before. You will need to adjust the size relationship between the planet and the spaceship. The easiest way to achieve this is to scale down the spaceship and then adjust the camera. You probably need to adjust the Field of View.
Once they are in position, add a new script to the spaceship
We will add two methods to our script. One for adjusting the distance to the planet surface based on noise and one which will add noise to the rotation of our ship.
SpaceshipStruggleMovement.cs
While there is not much in here that is overly complicated, I want to note a few things.
-
In the
Start()method I grab the current location and rotation of the rocket. This ensure that any positioning updates we make in the editor will be reflected in the sketch. We don’t hard-code some values here. -
At the end of the PerlinNoise statements I subtract the
rotationScalemultiplied by a half. This is to ensure the noise is zero-centered and we don’t add a pitch in any direction. Go ahead and remove this to see what happens. (And yes, I know what I said about Magic numbers, but I think in this case that’s fine.) -
The
+ x,+ yand+ zon theTime.timefor rotation are just here to create a random offset in time. This will prevent that all rotations happen at the same time. You could create this with more control using additional variables. -
To iterate over my point from earlier: Look at
Update()and imagine coming back to this script in two months. Just two lines of code and you know what the whole script does. You don’t necessarily know how. But what is happening is easily identified.