12 - Animation
You might wonder why there is a dedicated chapter on animation. Most of our sketches are animated. Yet, here we create animations which don’t use some convenient mathematical method. Perhaps we are leaving the grounds of “creative coding” here, as we will create animations and animation curves manually. Yet I’d argue that while creating these curves through math is possible, it’s so much more convenient to adjust them manually.
I also think your skills in math shouldn’t hold you back from creating interesting designs. Animation is incredibly important in design. Good animation can spark joy looking at and even breathe life into lifeless objects. It can also make User Interfaces more pleasing to use. Even simple animations can be used to great effect.
The entire discipline of animation is so important that several, even more specialized, fields evolved around it over time: From “Traditional Animation” through “Motion Design” to “Character Animation”.
Thus, animation should play an important role in our sketches. We will focus on the absolute basics, which will apply to all kinds of animation. But I will link you to some more advanced resources to you to dive deeper.
Animation in Unity
The Unity animation system can be used for small and simple things, but it also scales well into complicated animations of characters. The possibility to switch and blend between animation plays in important part the animation system. If you are familiar with animation systems in post-production software like After Effects, Maya or Blender, you are used to selecting an object and being able to “just” add keyframes. This doesn’t work in Unity.
Animations in Unity comes with two components: an Animation Clip and an Animation Controller. The Animation Controller can handle multiple animations. It switches or transitions between the Animation Clips. This allows you to create multiple animation clips for one object, like walking, running or jumping for a character. The animation controller will then switch between these animation clips based on player input.
While this might seem complicated at first, it’s a fantastic system. The use of these clips makes all your animations reusable. Once you create an animation, you can use it repeatedly on any object that has the same components applied to it.
You also don’t have to concern yourself too much with the animation controller when starting out, because Unity can handle its creation for you.
Classics are always an excellent way to get started: Let’s create our first bouncing ball… eh.. cuboid!
To get started, add a cube to the scene and zero out its transforms. You can also create another cube as a floor to bounce around on. Next we need to open the Animation Window: Animation ---> Animation Window or Ctrl + 6.
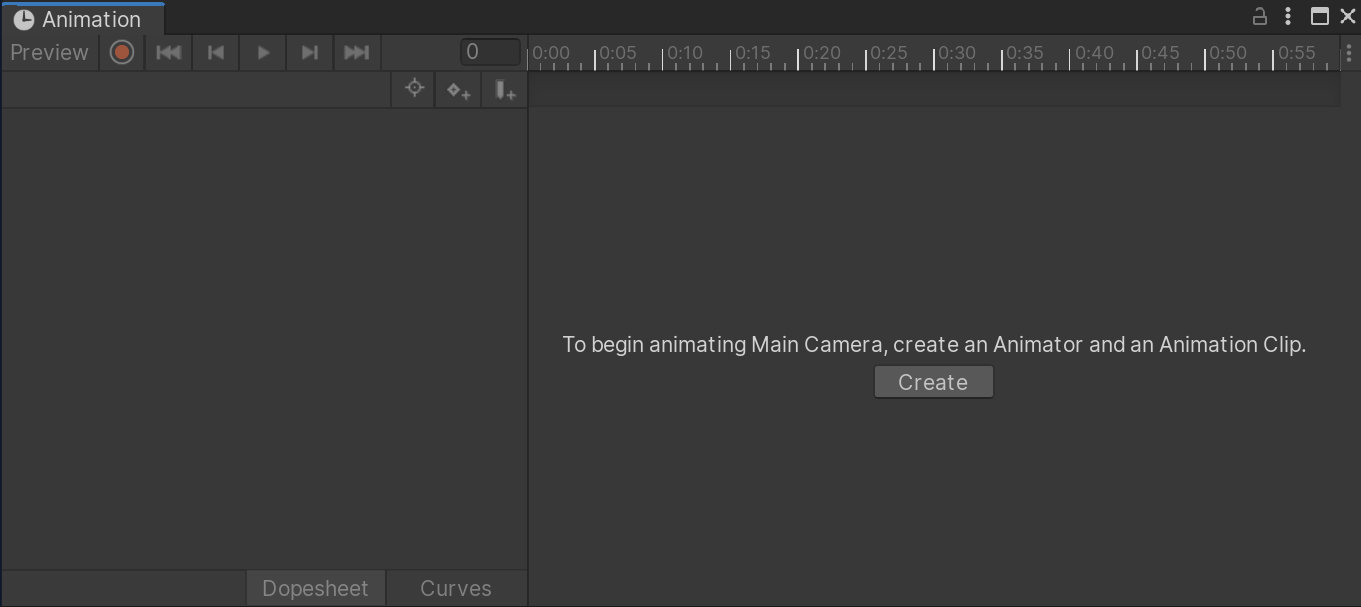
The Animation Window
With the cuboid selected, the animation window should offer you a button to create an Animation. We save animation clips as individual objects on the hard drive. You could even copy them to a different project, if you wanted to. Talk about re-usability!
If you create Animations this way, Unity will automatically create an Animator Controller for you and apply the animation clip. But we will ignore it for the time being.
Animating the Cuboid
Before we start, we need to add the properties we want to animate. Once you click the add button, it presents you all the components applied to the cuboid that have properties that can be animated. From the transform component, add the position and scale parameters using the “+” icon.
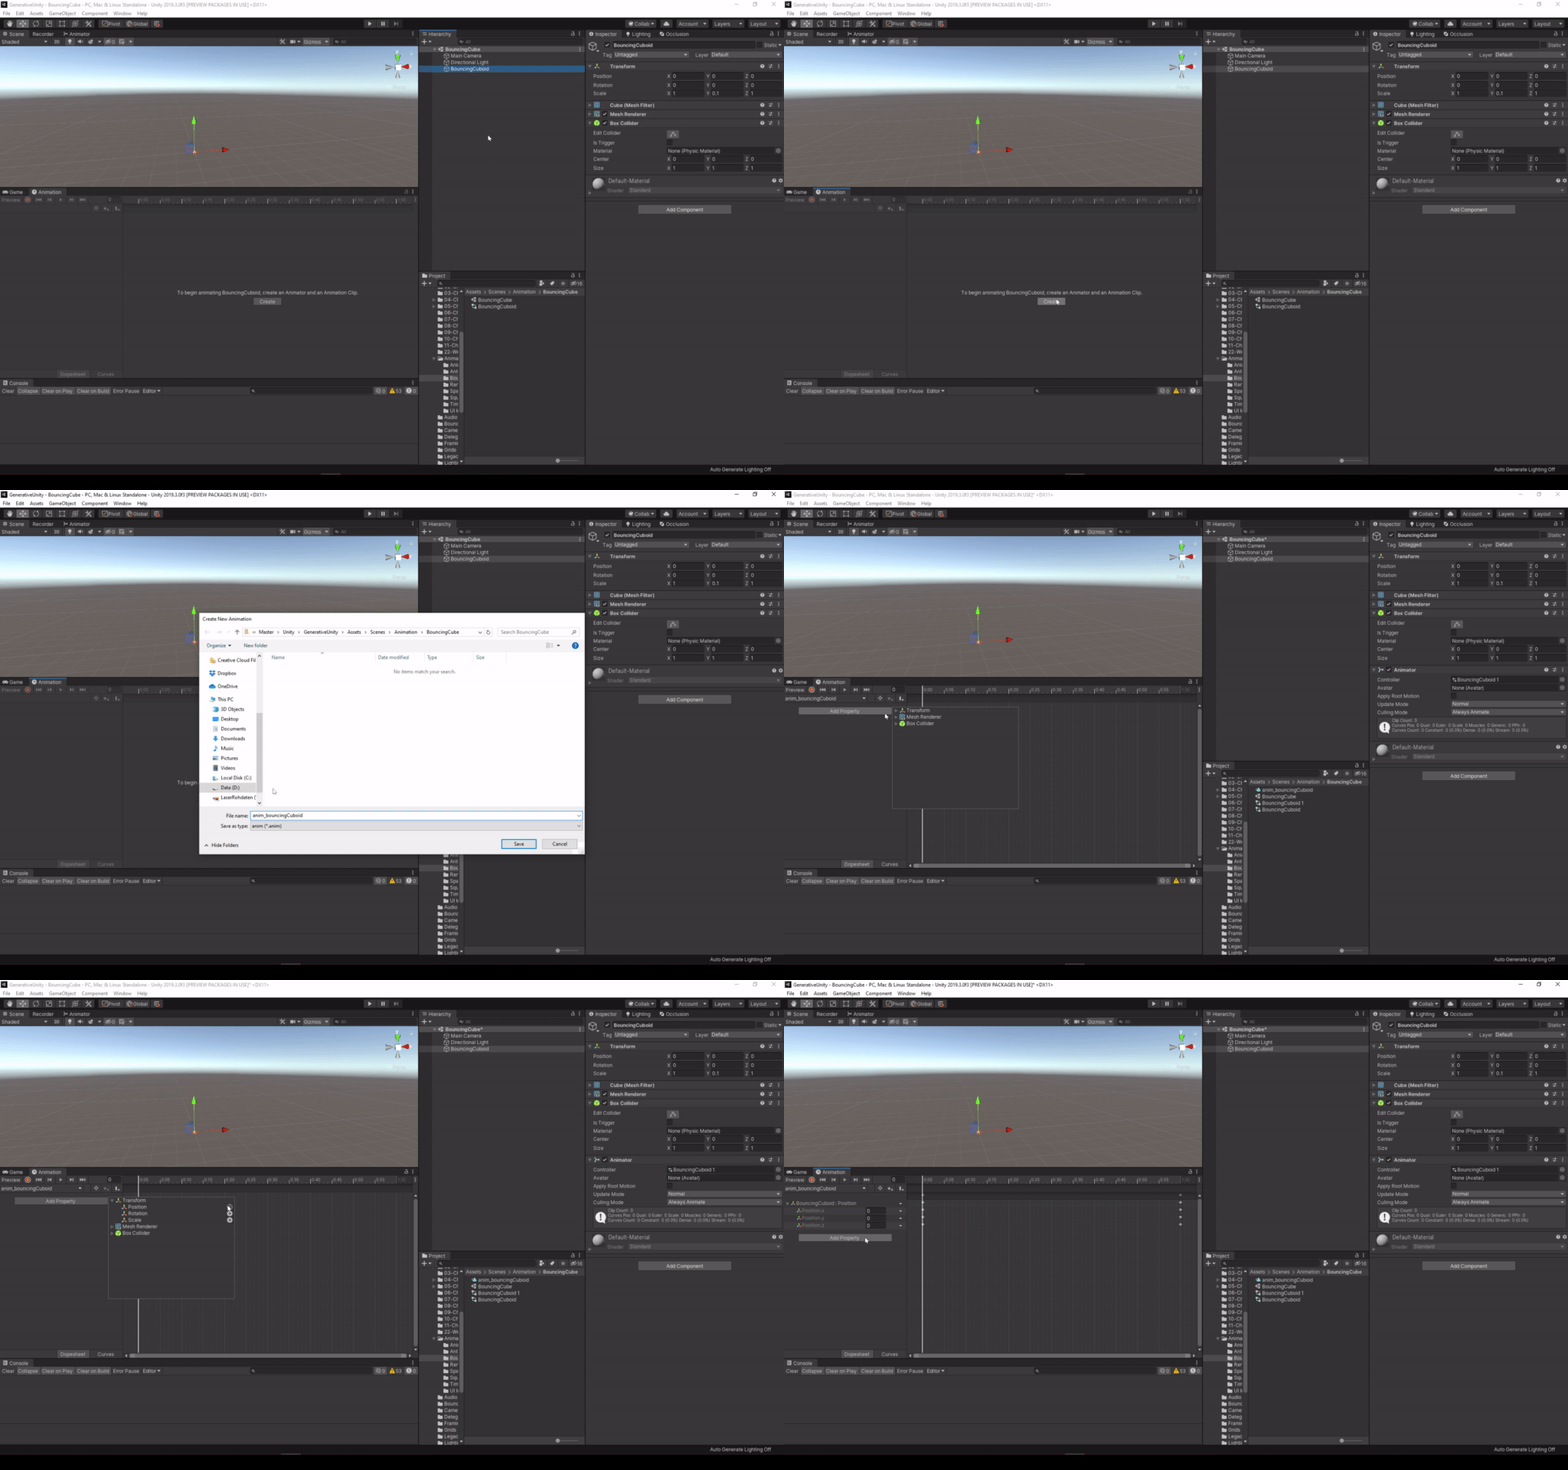
Adding Animation and Animator
Unity creates a default animation which is one second long and does nothing.
To change the values, drag the play head to the position on the timeline you want to add a key frame at. You can only change the values of keyframes at the current position of the play head. If you want Unity to set keyframes automatically while editing, press the little red recording button on the left.
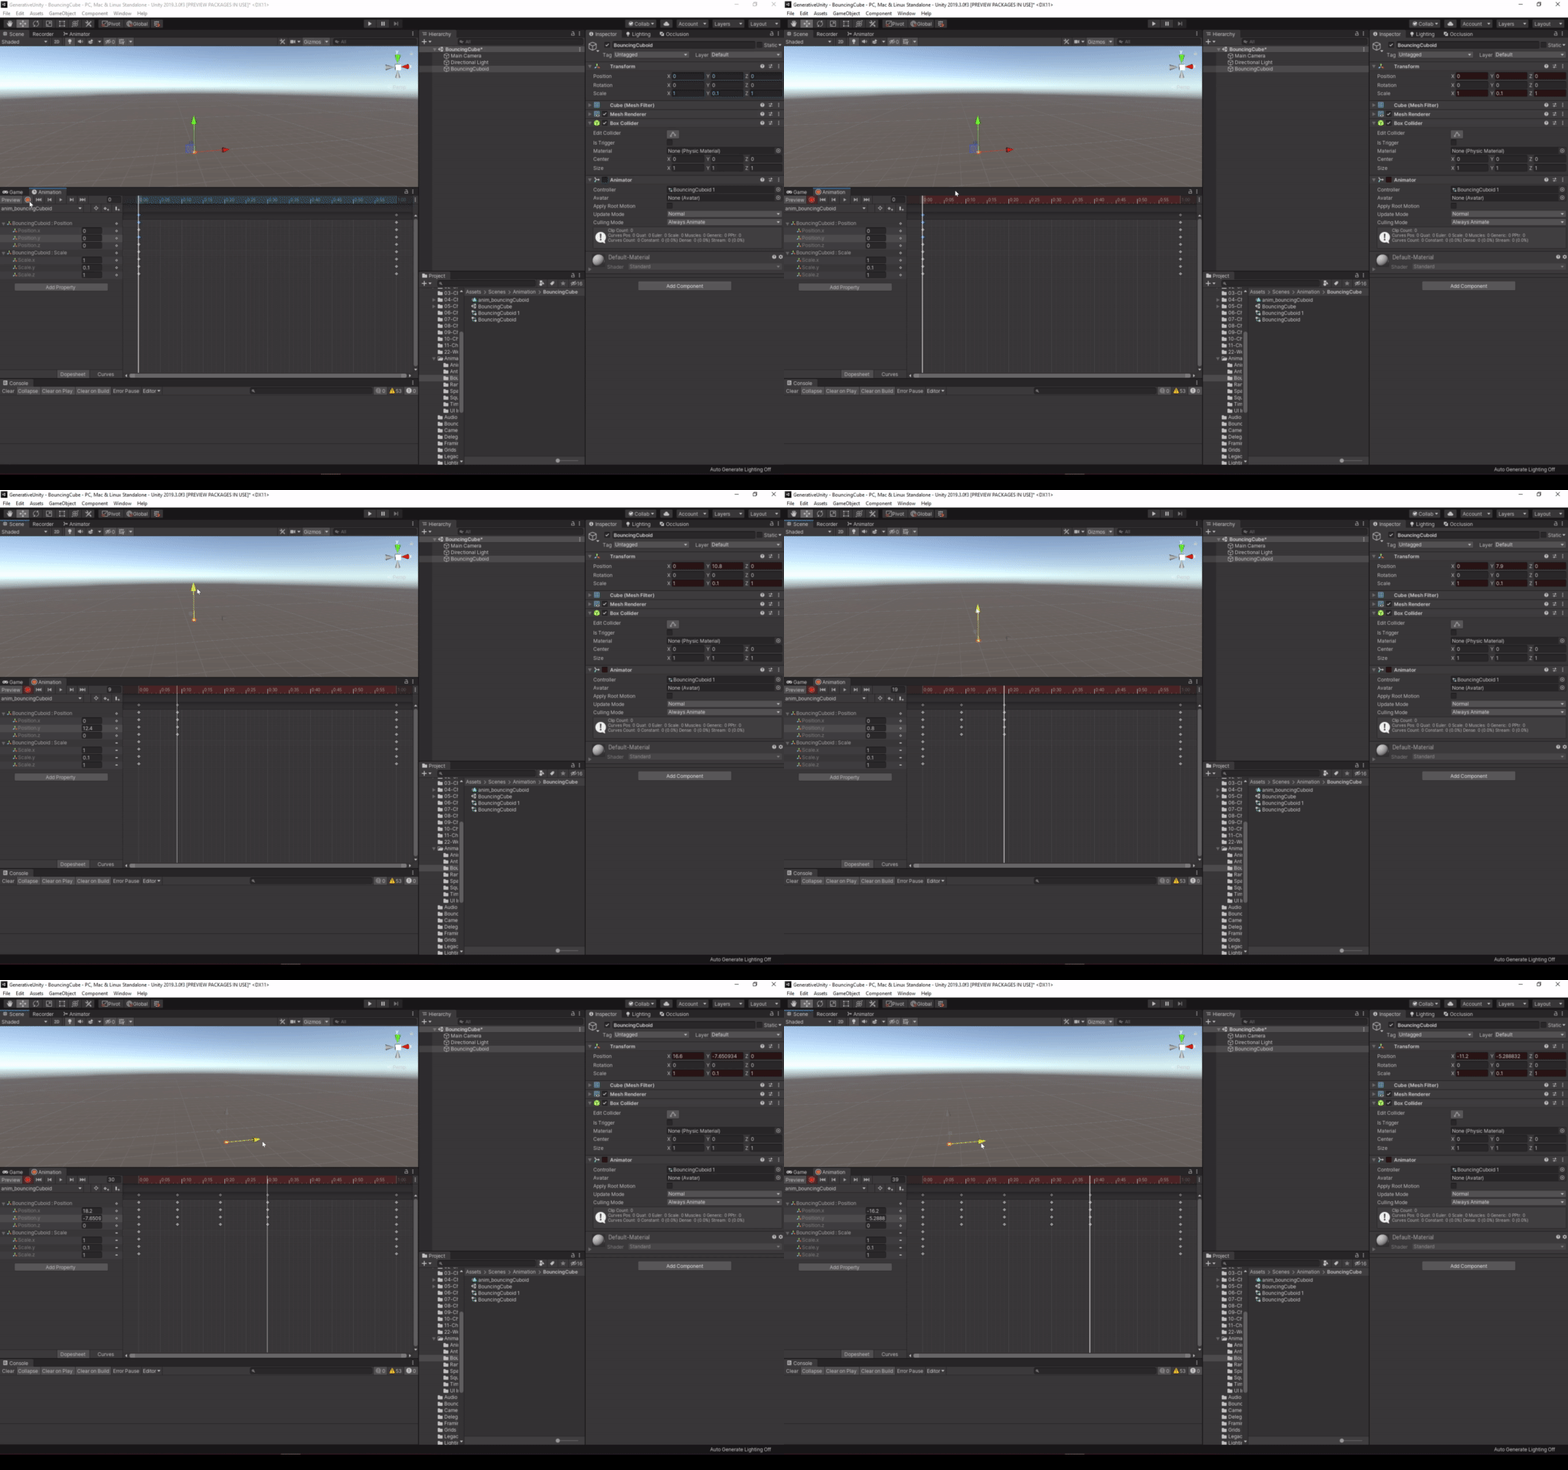
Animating in Rec Mode
While Unity will create some default interpolation for us while adding keyframes, it’s likely that we want to tweak them. In the lower bar of the Animation window you can switch between the “Dopesheet” and the “Curves” view. For finer control over your animation, the Curves view is an indispensable tool to create great animations.
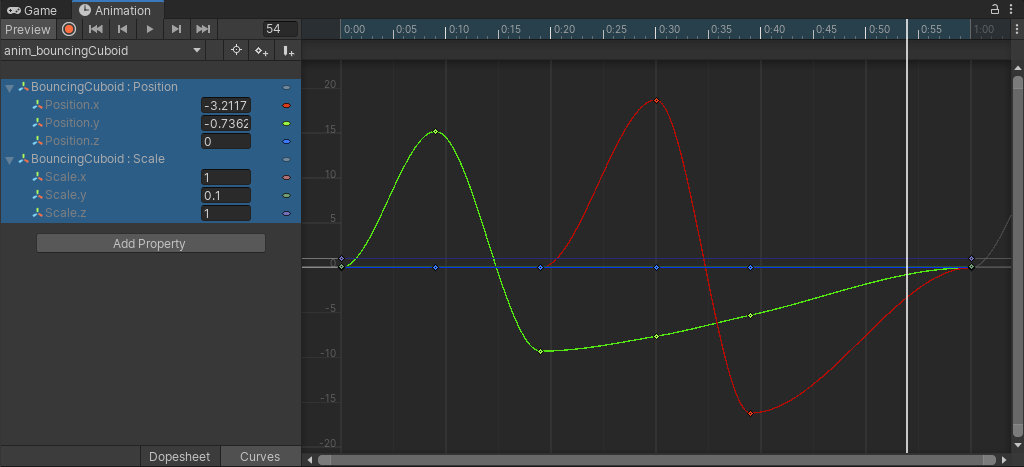
The Curve Editor
Unity will show you the interpolation curves it created automatically To adjust these just grab the corresponding keyframes. Using the handles you can adjust the interpolation between the keyframes. If you need hard changes in your animation, e.g. in a bouncing animation, you need to work with broken handles. To switch the handle types, select the keyframes you want to affect and from the right-click menu pick the interpolation type you want to use.
While you can always preview your current animations using the Animation window, you can also switch to playmode. Unity by default sets animations up to run in a loop.
So here is the result and the curves for my super simple bouncing cuboid:
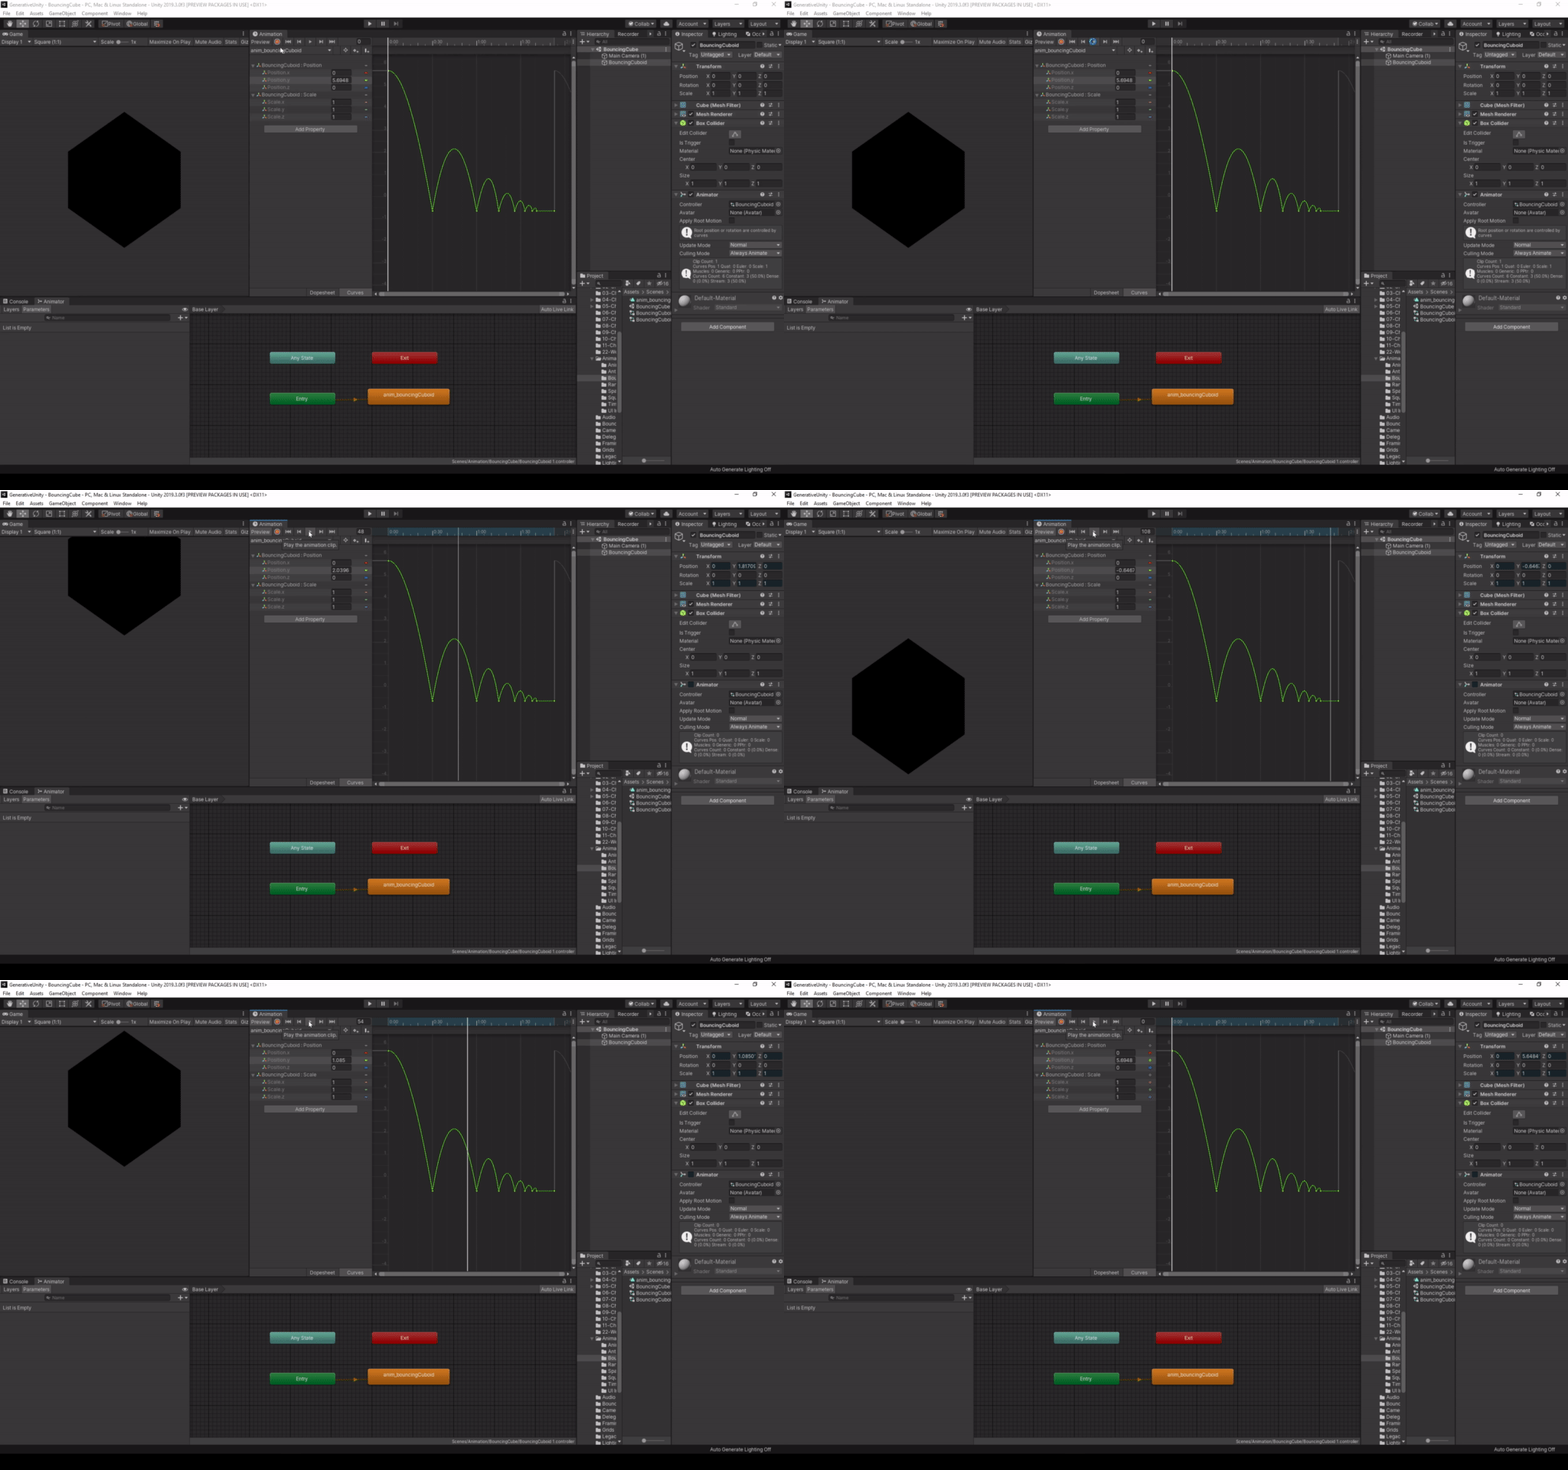
The Curve Editor
Because animation is hard work, Unity has at least some shortcuts set up for us, to make our lives easier. And while this is not as comfortable as working in a dedicated animation package, it is good enough for small things.
| Shift+Comma | First Keyframe |
|---|---|
| Shift+K | Key Modified |
| K | Key Selected |
| Shift+Period | Last Keyframe |
| Period | Next Frame |
| Alt+Period | Next Keyframe |
| Space | Play Animation |
| Comma | Previous Frame |
| Alt+Comma | Previous Keyframe |
The Animator Controller
So now that we know how to create Animations, let’s review how to set them up and connect on the Gameobject itself.
If you inspect your cuboid, you will find that the component that’s applied to the cuboid is an “Animator” and not the “Animation Clip” we created earlier.
The Animator handles the animation of your object and just plays animation clips. It is also handling things that only become relevant in more complex scenarios, like applying “Root Motion”. (Try it, it’s fun.)
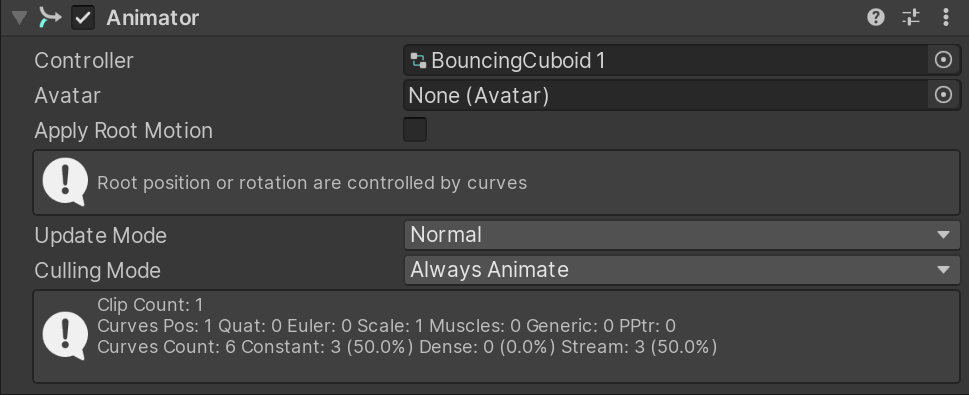
The Animator Component
The first parameter the Animator supplies is a Controller. That’s likely named “Cube”. Or if you have renamed your Cuboid before creating the Animation, it’s named like that. If you double click that Controller Unity will jump to the Controller in the Project View. It should be in the same folder as the Animation Clip you created. Double click on it and the Animator Window should pop up.
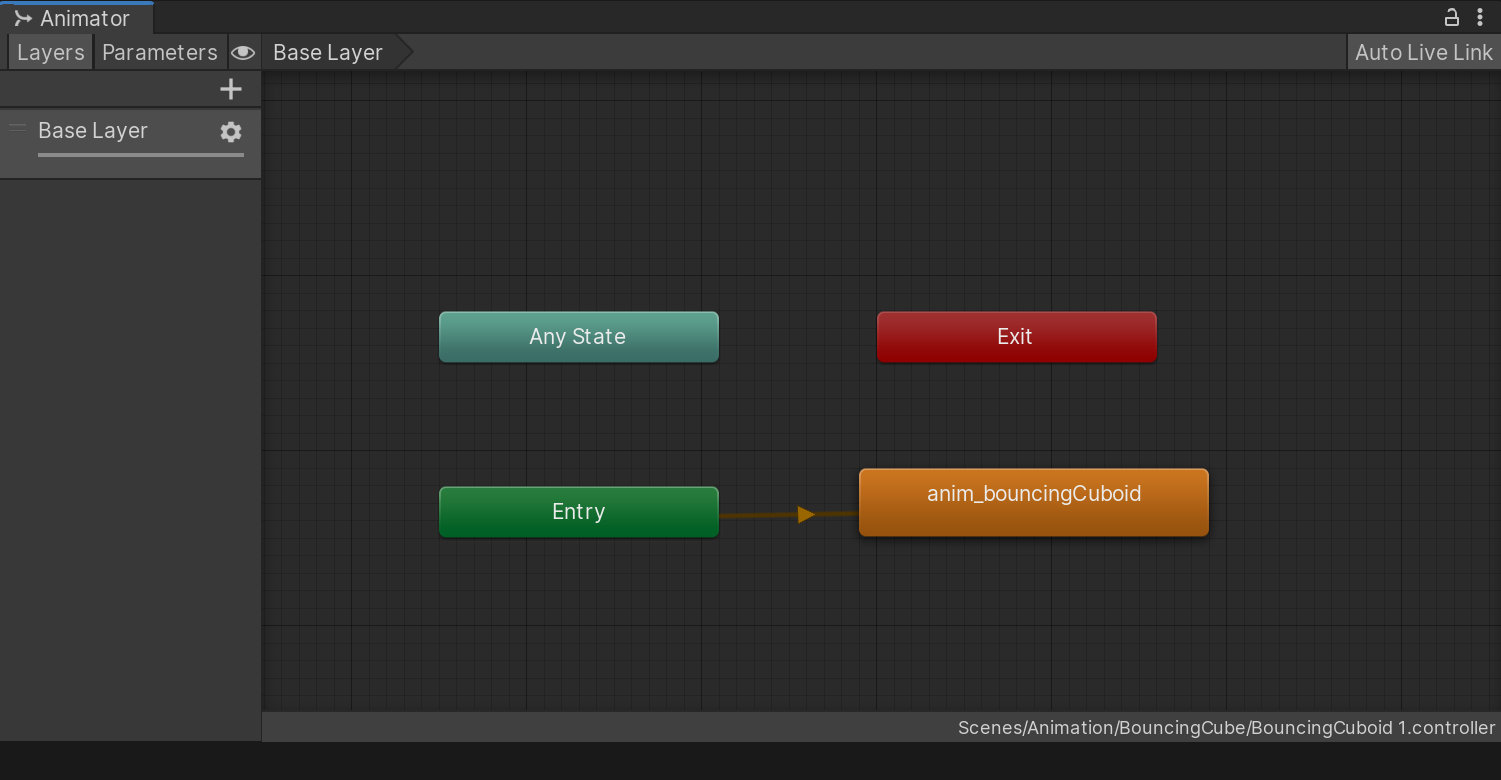
The Animator Window
Here you will see a left side with an entry called Base Layer and a view containing four elements. This is a “State Machine”. It keeps track and manages the state the current object is in. It also is in charge of “if and how” this object can transition to another “State”.
By default, it contains four states. “Entry”, “Any State”, “Exit” and a state named after your animation clip. It links the Entry State to your animation clip. As soon as you go into playmode, the state will transition from Entry to your animation and the animation will play. If you switch into playmode, you will see a progress bar appear on the state that is playing.
Go ahead and create an additional animation clip, or just duplicate the one you have. Drag and drop the new clip into the state machine. It will not have any connection by default, so we need to set it up. Select either of the Animation clips and go right click ---> Make Transition. Then click on the object you want to transition to.
You can make transitions in both directions. Start the transition on the object you want to transition from. Create two different animations and create connections that makes them go from one to the other and vice versa.
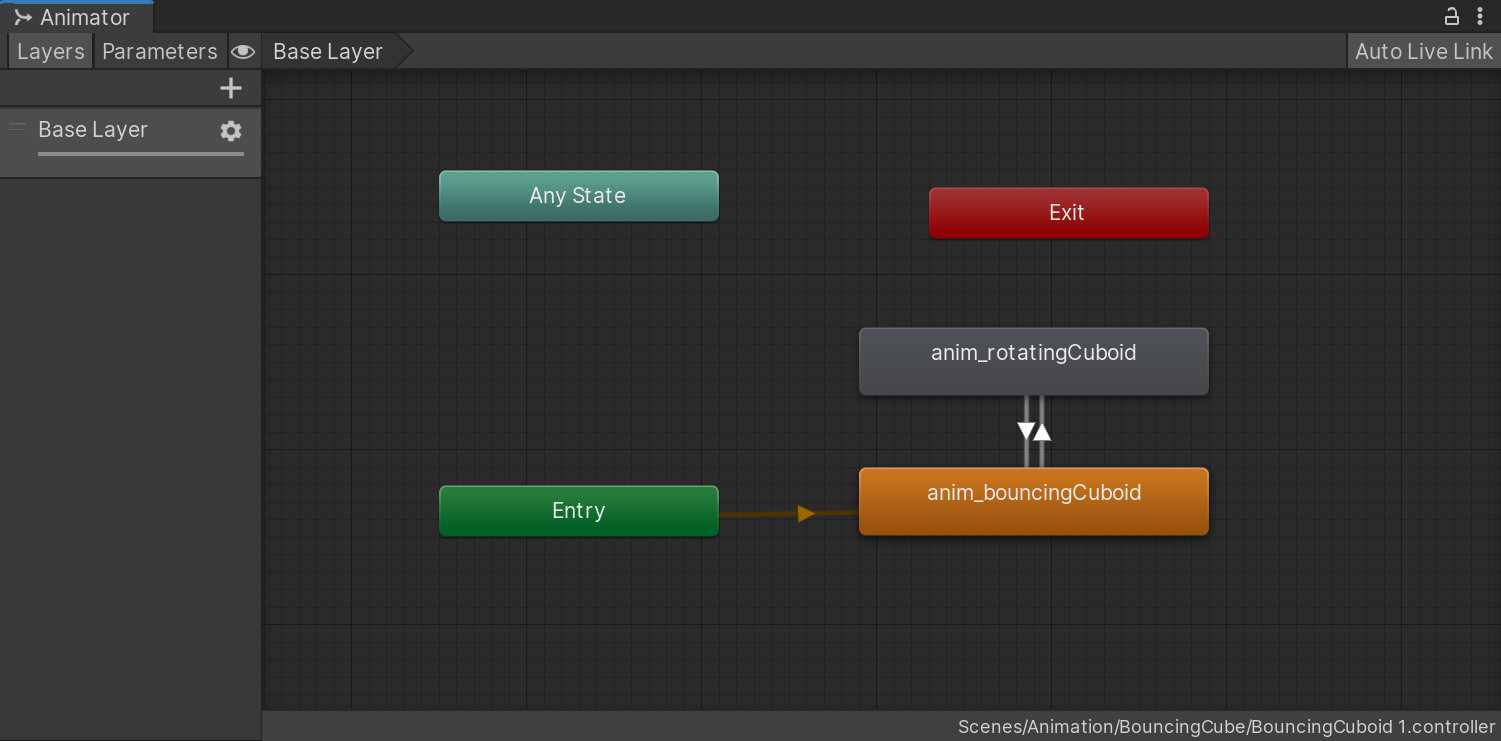
Animation States with Transitions
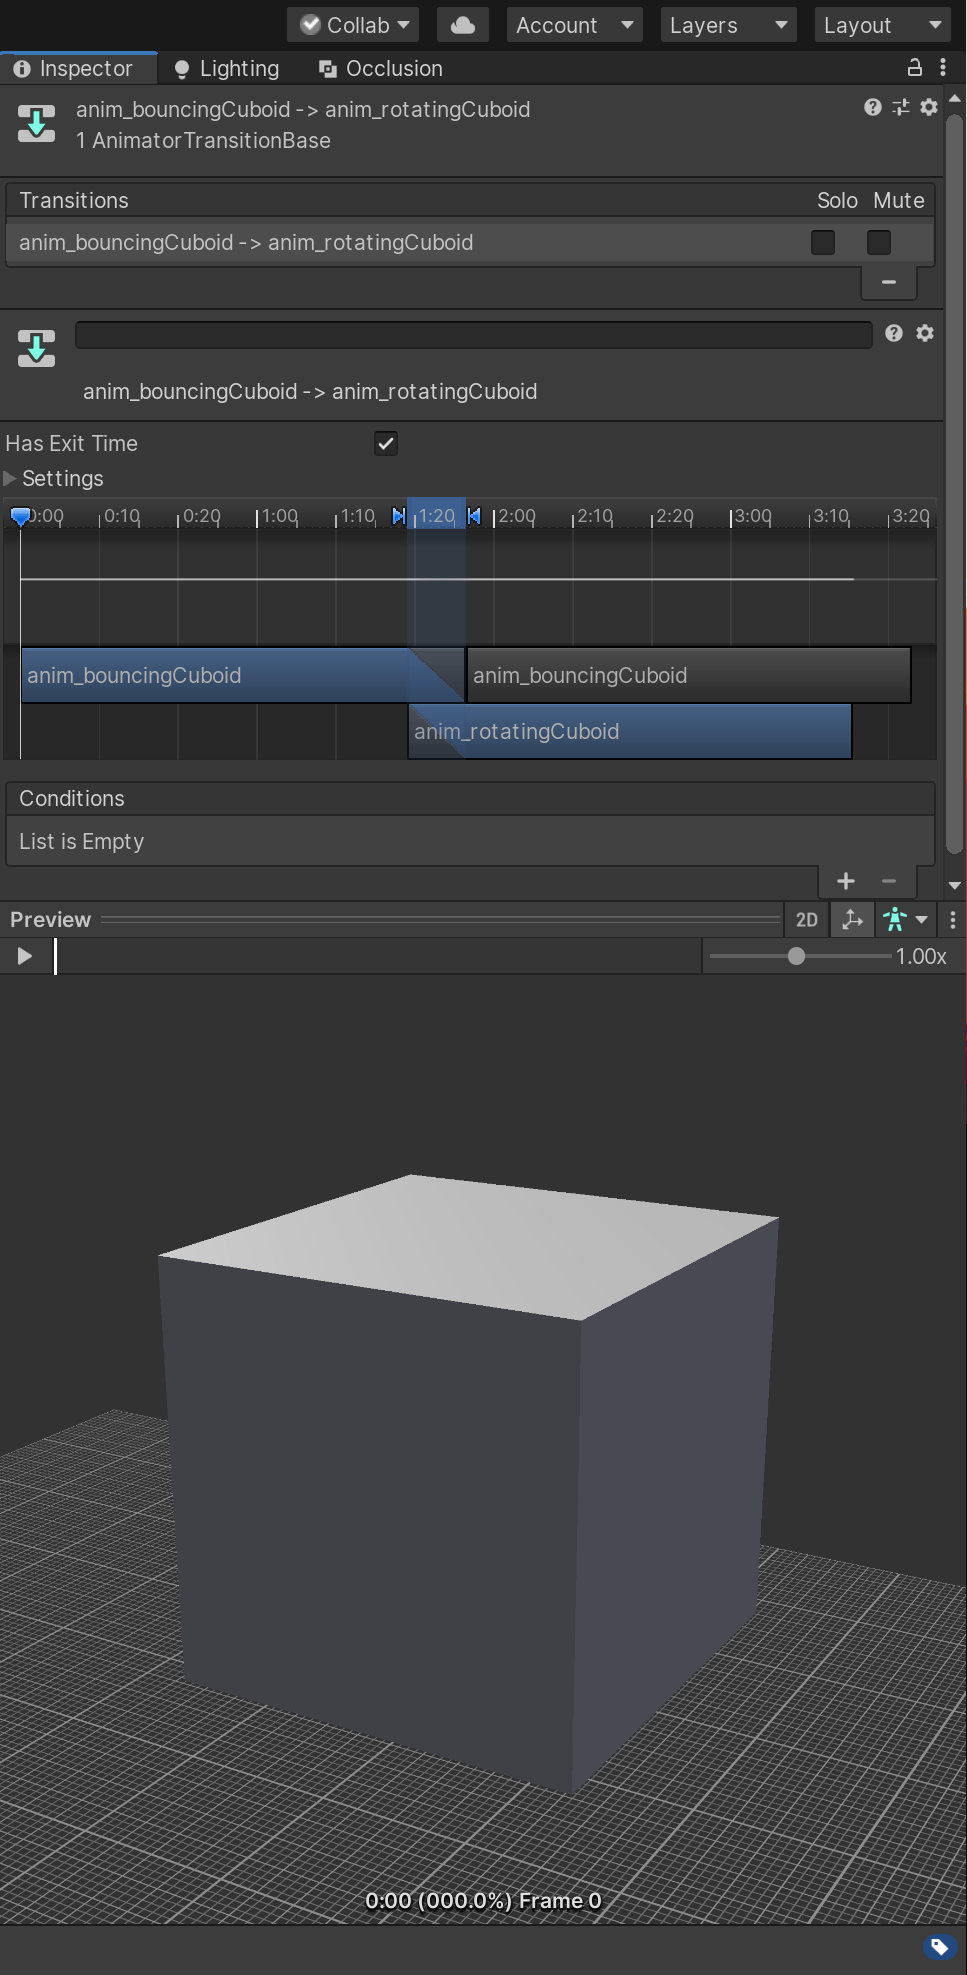
Now, depending on the animation you have set up, you might notice that your animations look sluggish. At least when I first did this, it totally confused me. The entire system is set up to manage characters as well and these states could be things like jumping, running or sitting. Thus Unity applies a blending operation between the states by default.
To adjust it, select one arrow/transition and then check the inspector. Here you will see a transition timeline. If you have to move the left arrow on the play bar right next to the right one. Now you can move the lower clip to the right, and there will not be any transition blending.
The Transition Settings
If you select a transition in the inspector, you will also get a preview window at the bottom of the inspector. Here you can view the transition and make adjustments to it.
Intermission Projects
This whole workflow of creating animation clips, setting them up in animation controllers and transitioning between them needs time to get used to. So why not combine improving muscle memory with refreshing some of our Animation knowledge?
The three key elements of animation are timing, easing, and spacing. Timing refers to the actual time or frames it takes for a motion to complete. Spacing refers to the distance an object is moving in screen-space per frame. Finally, easing refers to the mathematical functions we used to create smooth or abrupt motion using curves. These affect one another!

Same easing, different timing

Same timing, different easing
It’s also a splendid moment to remind ourselves of the Twelve Principles of Animation! Ollie Johnston and Frank Thomas first defined these twelve principles in their book “The Illusion of Life”. If you have never heard of them, you can just search on YouTube or Vimeo. There is great content about them out there.
Why not build animations based on the first two principles:

Squash and Stretch

Anticipation
Once you are done practicing the creation of animations let us head into scripting animations!
Scripting Animations
The simplest way to start an Animation is to just start it by using its name. To do this, we first need a properly set up Animator, meaning we need different States we can switch between. We will create an Animator with two animations and an empty state which will be our go to state.
As our Animator is the way to get access to animations, we need to create a reference to it in our script.
private Animator myAnimator;
   void Start()
   {
       myAnimator = GetComponent<Animator>();
}void Update()
{
if (Input.GetKeyDown(KeyCode.A))
{
myAnimator.Play("anim_lowerCuboid_Anticipation 0");
}
}As you can see, all we need to do is call the Play() method and provide the name of the state we want to call. Unity derives the state name from the animation name, thus they are likely the same. If not, make sure to provide the state name!
The Play() Method is fantastic if you just want to fire a specific animation and have it play from start to finish. No hustle, no interruptions. On the other hand we have to pass a string as a parameter. This is always prone to error.
Another option to control animations are parameters. Parameters allow us to be a little less specific in our code and thus give us more flexibility. Yet they are also more focused on dealing with User Input or other kinds of states. Thus they are a slightly more work to set up.
To use parameters in our scripts, we first need to create parameters in the state machine we can use as triggers. On the left side of the Animator you can switch from layers to parameters. Using the “+” in the upper right corner, you can switch between different types of parameters. For now, let’s go with trigger.

A Trigger Parameter
To use our created parameter, we need to hook it up to a transition. If you select the transition, you will find a list of conditions. Select your trigger and you are done. Trigger types need no further setup. To test this you can switch to play mode and then click the little Circle on the parameter. This simulate the firing of the trigger.
Now your animation should play and the Circle should “turn off” again. Triggers just fire the signal once and then go back to their default state again. If you click the trigger repeatedly, your animation should always jump back to the start again and play. There may also be a very weird transition from your object’s current position to the beginning of the animation. This is expected behavior. As we are not playing states directly, we use these transitions to switch states. And transitions do what the name suggest: They create a transition between two states.
You can fix this by selecting the transition and prohibiting it from transitioning into itself. You can find this setting in the Inspector under Settings. “Can Transition To Self” is what you are looking for. This forces the animation to play till the end. Transitioning into another state would still work.
And this is what we need to do in order not to get stuck in one state. You can create an “Empty” state using right click. Then create a new transition into this state. Once your animation finishes, it will transition here and can then be re-triggered through the “Any” state. Your Animator should look something like this:

The Animator Component
To now script this, we can use this code:
using System.Collections;
using System.Collections.Generic;
using UnityEngine;
public class startAnim : MonoBehaviour
{
private Animator myAnimator;
void Start()
{
myAnimator = GetComponent<Animator>();
}
void Update()
{
    if (Input.GetKeyDown(KeyCode.A))
    {
        myAnimator.Play("anim_lowerCuboid_Anticipation 0");
    }
}
}The advantage of using trigger is not only in the possibility to use the transition feature, but we can also trigger multiple animations on the same Animator. This would be useful for more complex animations like for characters.
The other parameters like float and int can choose animations based on some variable. Your animation could change based on the speed of an object, for example.
Projects
Control animation through UI

UI Controlled Animation
Our first project will control animations through User Interfaces. We will also use coroutines. Unity offers these to e.g. delay the execution of some code. In our case, triggering animations.
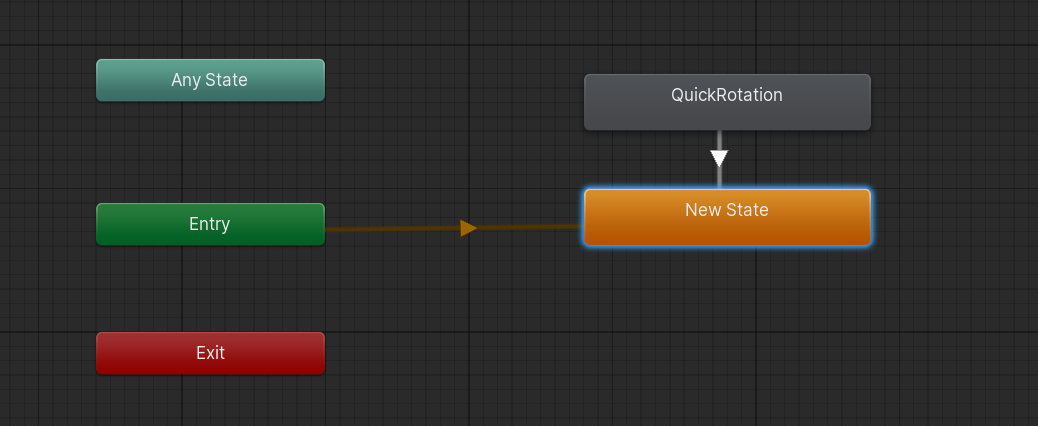
The first thing we need to set up is a proper prefab. Proper means the prefab needs to have an Animator already attached to it and the animation present as a state. You don’t need parameters. We will rely on the Play() method. Also remember to have it transition to an empty state. The Animator looks like this:
The Animator Setup
We also need to create a simple User Interface as described in the UI chapter. We will add two Sliders and a button. The first slider will control the delay between the animations and the second will control playback speed of the animation. The “Play” button will start the animation using the current settings.
So let’s look at the script:
AnimUICubeManager.cs
The beginning should be very familiar. Just the typical setup for multiple cuboids we have seen before. Next up are two animations that do nothing but take a parameter set that value to a variable we declared globally. We need these two methods to change values through our sliders. When you set them up, remember to choose the “Dynamic” method from the drop down, as described in the User Interface chapter.
This leaves us with an IEnumerator and a method to start this as a Coroutine. Coroutines interrupt methods for a certain amount of time, and then they automatically pick up where they left. Here we start a for-loop and after each iteration we wait. Yet this wait time will not affect executing the rest of the program. Thus we can use this to delay the animations on different cuboids.
We can’t call the IEnumerator directly and have to call it using StartCoroutine(). We have to pass the IEnumerator as a string. So be very mindful of typing its name precisely.
Triggering Events in Animations
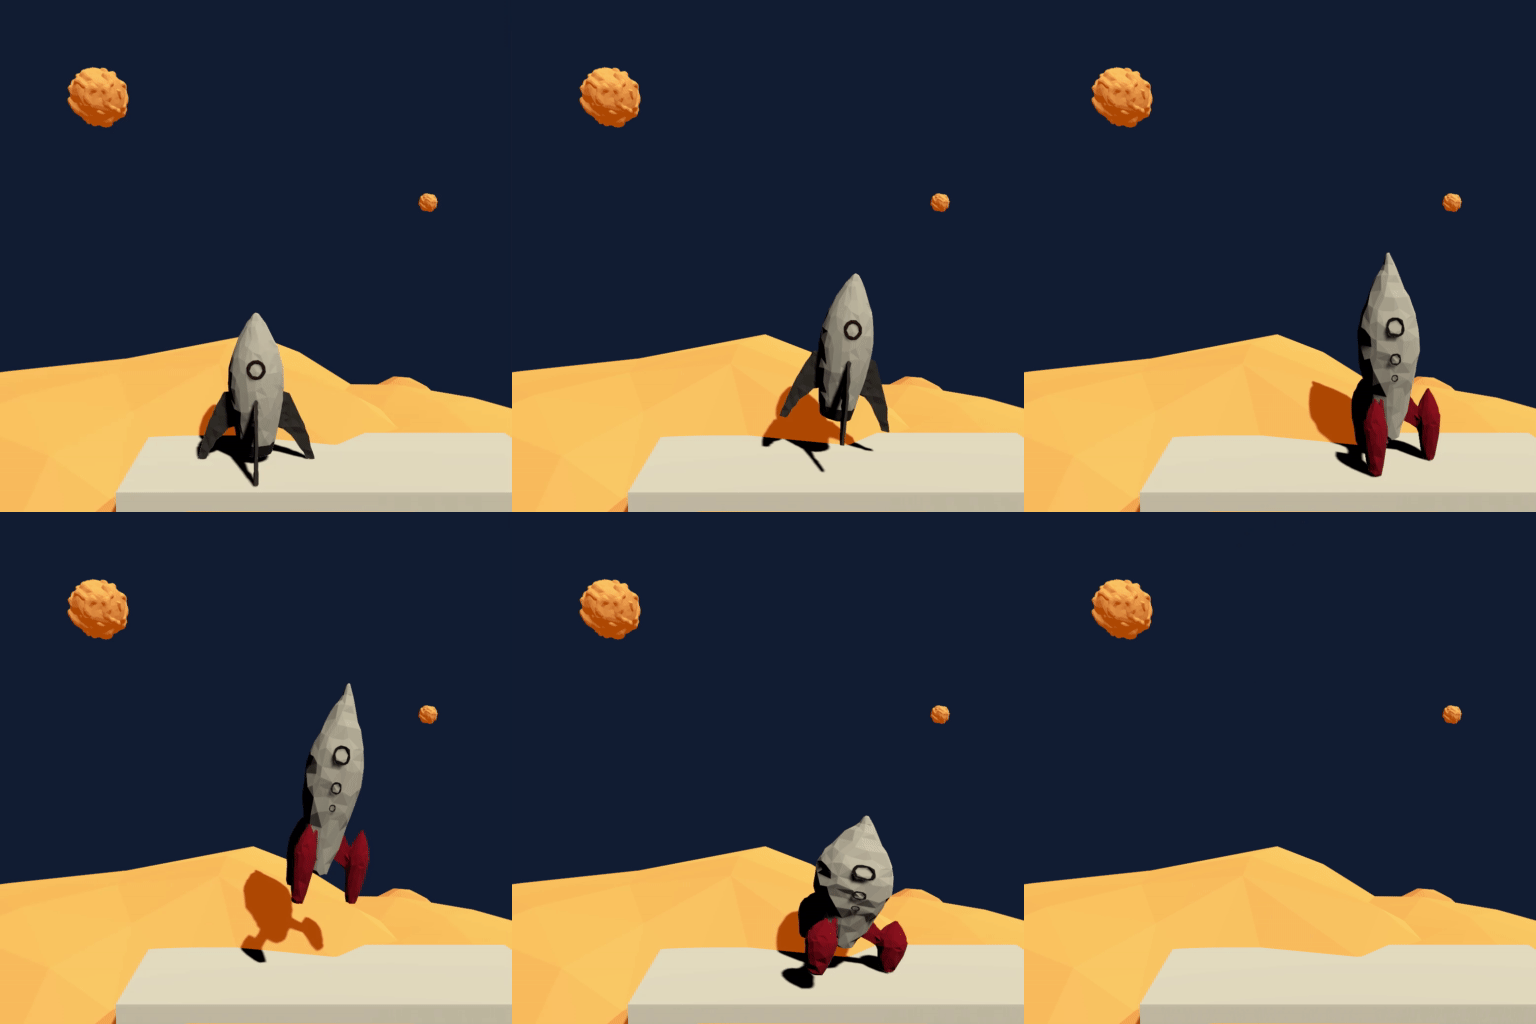
In the second project we will choose a random animation and also a random object to animate. To achieve this, we will use Events in Animation Window. Events show up at the top of your Animation Timeline and they trigger a function once the play head moves past them. We will use an event to choose a different rocket once it is not visible anymore.
Randomized Rocket Animations
Obviously this would get more interesting with more rockets and more animations, but we are here to understand the concept.
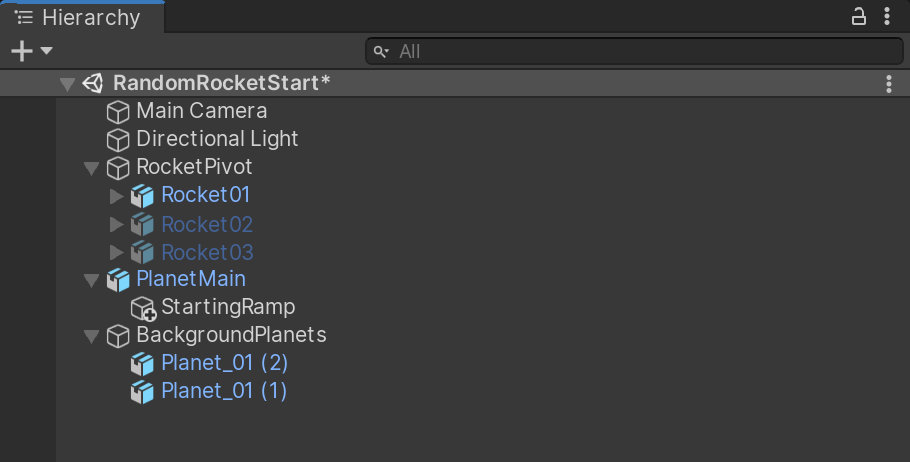
Let’s first look at the setup on the hierarchy view. To apply the same animation to all rockets, we parent them under the same object and apply the animation to the parent object. Now we can enable and disable the child objects to switch between them.
Hierarchy
The Animator has three trigger parameters and three animations set up. The triggers start the specified animations. All animations automatically go forward into the “anim_BackToStart” state. This is the animation that pushes a new rocket onto the starting ramp.
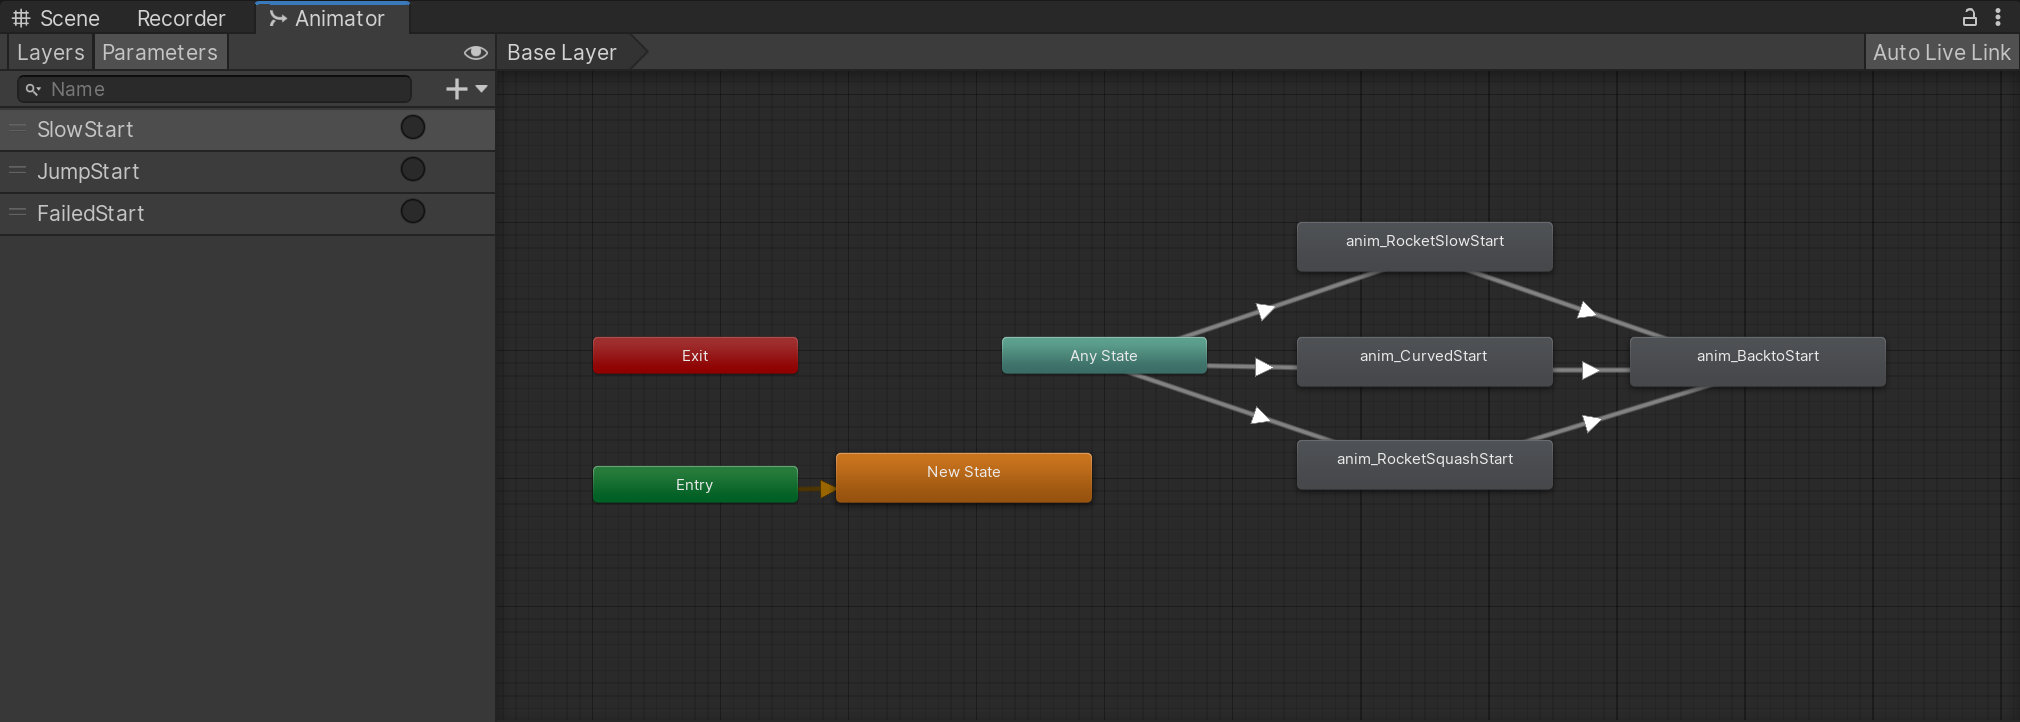
Animator
We set the transitions up to not be able to transition into themselves, yet they still can transition between one another, as we use “Any” state as a starting point. You could avoid this behavior by setting up the Animator differently:
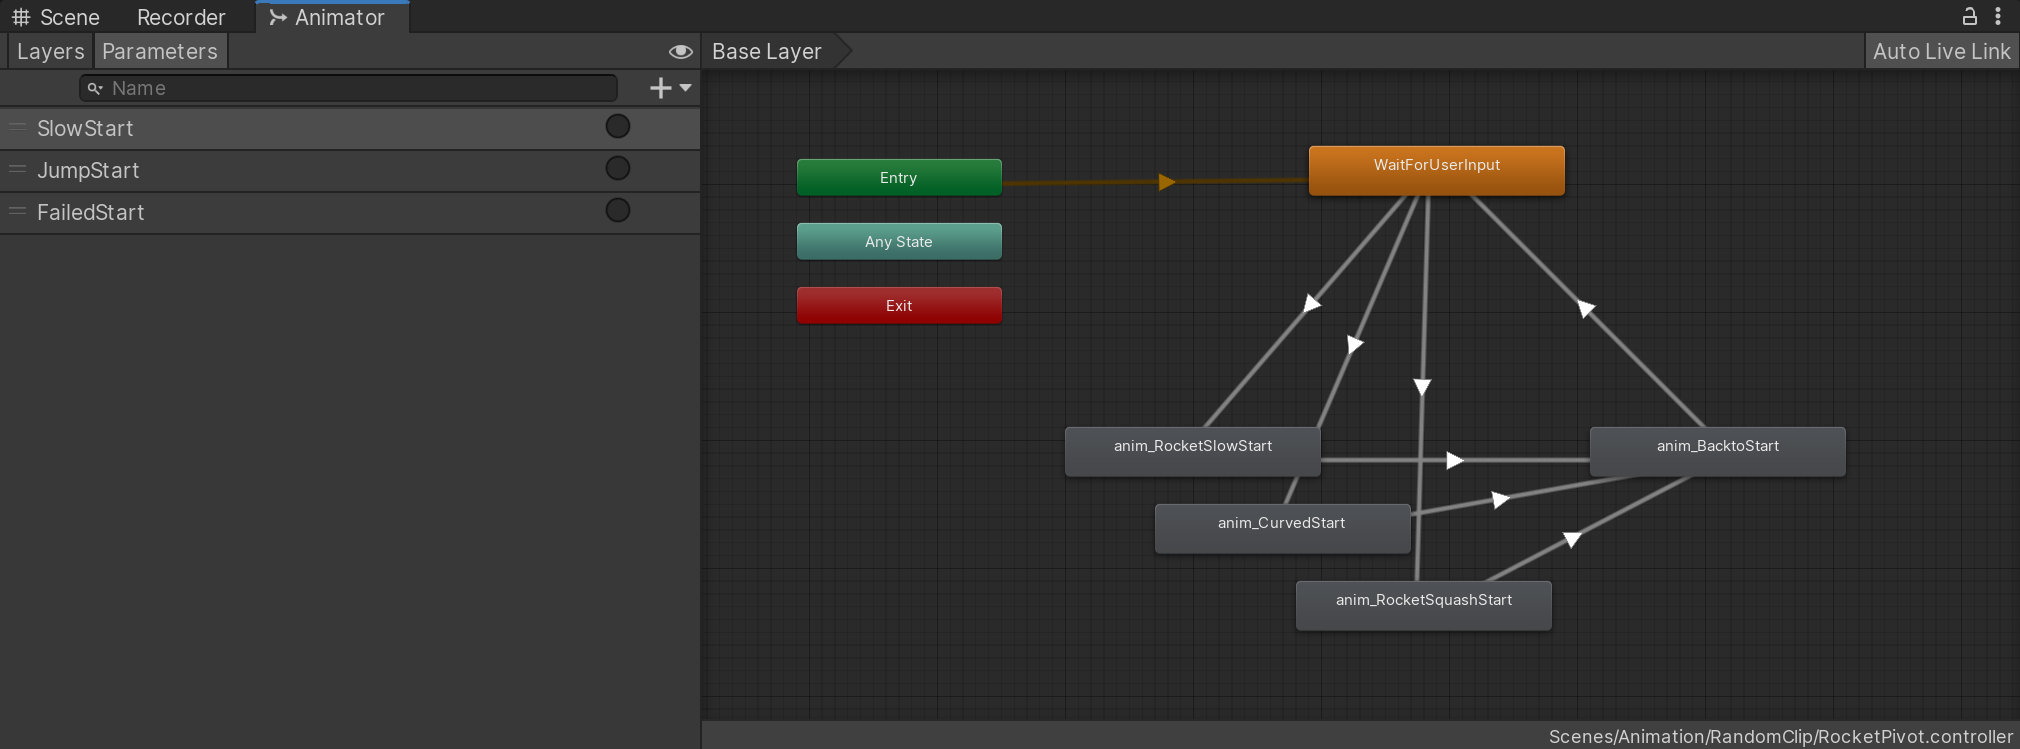
Animator Alternative
With the Animator done, let’s check out these “Events” I have been talking about. If you open the Animation Window, you can find on the left side a Button with an elongated pointer. That’s an event. You can add Events just like keyframes, yet it will only show them at the top of the timeline:
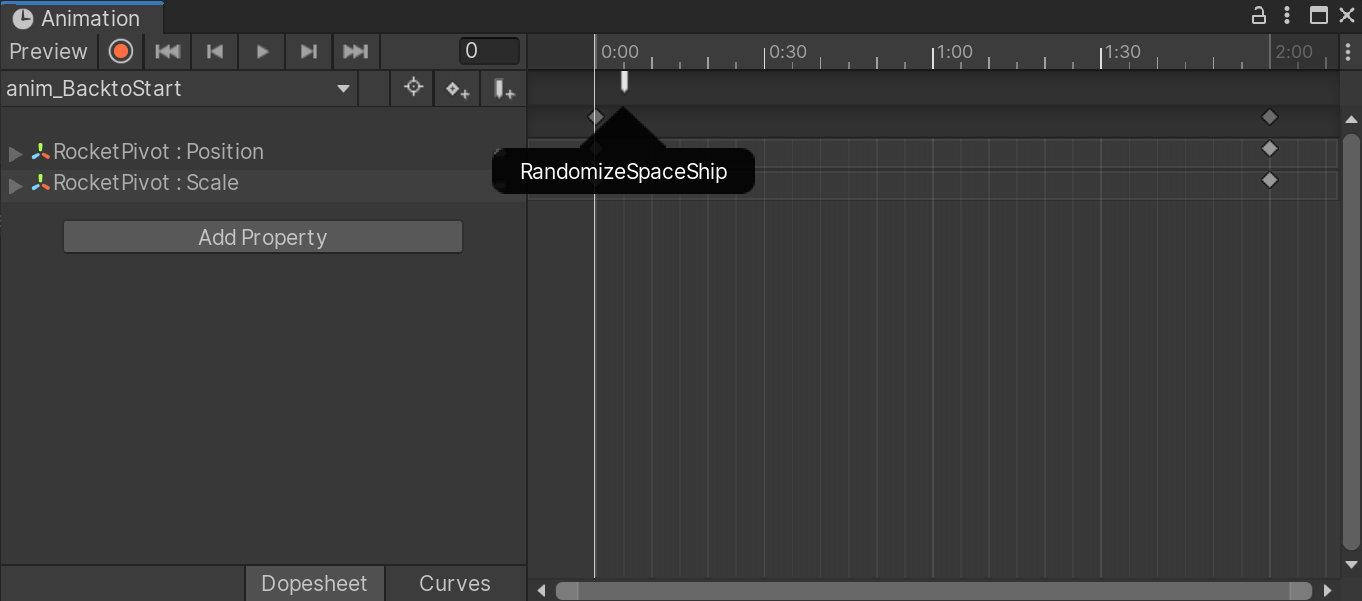
An Event
If you click on the Event, you can choose a method to execute once the play head passes this point. The methods you get to choose from are all public methods in scripts attached to the GameObject you are animating. And this brings us to our script - it’s simple:
AnimationTriggering.cs
We get the Animator and store it in variable. In Update() we check for User Input, specifically the “A” Key. Then we just create a random number and trigger an animation based on that. The other method in our script is the Script to Randomize the Spaceship we see. It also chooses a random number and enables and disables spaceships based on the value.
I think this is a grand example of how far simple scripts can take you inside Unity.
Additional Resources
If you are new to animation and want to know more, I suggest looking up these books. “The Illusion of Life” first introduced the 12 principles of animation and Richard Williams outdid himself with his survival kit. There is also a DVD Version of his book, which is great, too.
“The Animators Survival Kit” by Richard Williams “The Illusion of Life” by Frank Thomas and Ollie Johnson