16 - Audio
“Audio is half of the experience!". I don’t know how often I heard this sentence over the years. And it surly is true! Audio adds a fresh layer to the works you create. And for some genres audio is even more important. While you can easily close your eyes or look away, you can’t block out all the sound that’s around you just that easily.
Now that we have established the importance of audio in our projects, let’s look at some things we need to take care of, when dealing with audio in Unity. In comparison with cinema, audio in an interactive 3D world can’t be just laid out perfectly in one Stereo or Surround Sound audio track. Now the view axis of the camera in the scene defines the left and right audio channels. The Sound setup is as dynamic as is the camera. If we try to convey a realistic experience, we also need to increase volume as soon as we come closer, and slowly fade it away while the camera departs from the source.
Luckily enough, Unity makes setting these things up very convenient. To set it up, we need an “Audio Listener” and an “Audio Source”. The Audio Listener component comes pre-setup with every scene you create and is attached to your camera. You only really need to think about it, when you deal with multiple cameras in your scene, because only one Audio Listener can be active. It has no settings to take care of and can only be toggled on and off. Its that simple.

The very simple AudioListener
The “Audio Source” component is a little more complex. Yet, if you have ever dealt with any kind of Audio work before, you recognize many of these settings.
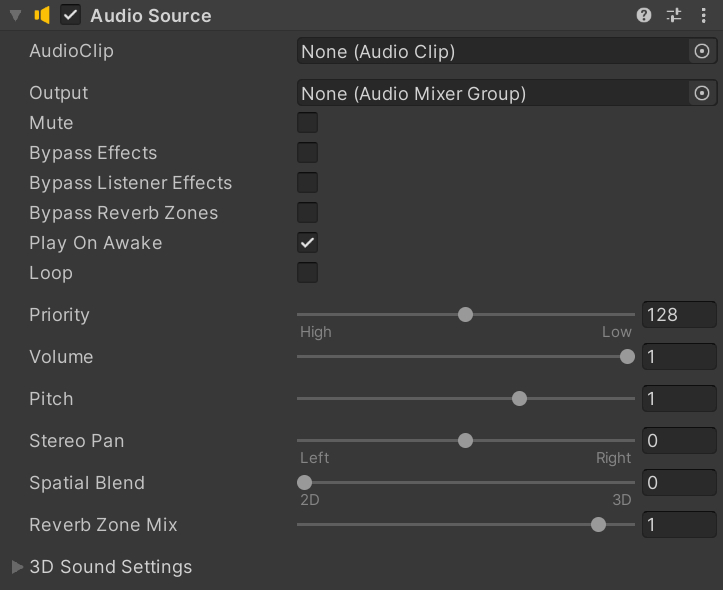
AudioSource Component
The first thing you will need to supply to your Audio Source is an “AudioClip”. To add an AudioClip to your project in the first place, you can just drag and drop any AudioFile into your project view. Or use Right click ---> Import New Asset... in the project view. Then just drag and drop it into the AudioClip on your Audio Source component. If you now enter Play mode, you will immediately hear the AudioClip you added. If you don’t want this to happen, disable Play on awake. You will also find some settings that will be immediately obvious: Loop, mute, pitch and volume. Bypassing effects should be self explanatory.
Now all audio clips will play as is. This is the perfect setting for your typical background music. But if you want your audio sources to be placed in the scene, bring up the “Spatial Audio” slider. To test this, make sure your camera and Audio source are in the same space in your world. Then enter Play Mode and you grab your camera and move it around in the scene, while the scene is playing. You should hear the Audio Clip fading away with distance.
We can define how harsh this falloff will be in the curve below “3D Audio Settings”. The pre-defined Logarithmic roll off is how sound would react in the actual world. If you want a more artistic approach to your Audio, you can switch this to a Linear falloff or even create a Custom falloff.
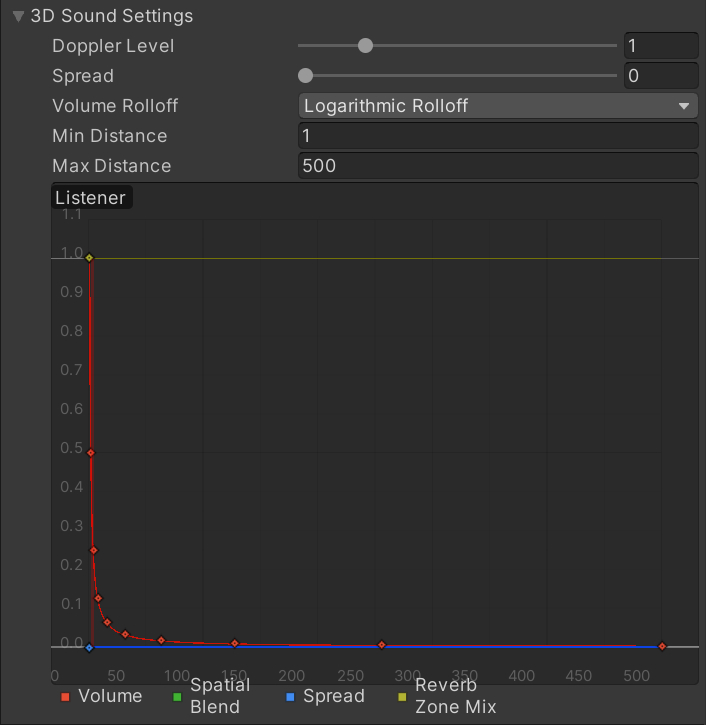
Falloff Curve
If you are not yet an audio nerd, it is probably a splendid idea, to experiment with these settings. You can even add Audio effect components like Echo and Reverb. I will not go over these, as audio and audio effects are a huge topic in themselves. But remember that we calculate these effects at run-time. So if you use Audio Clips that always add a “Chorus” effect, it’s better to apply such effects in an external program beforehand.
Now that we have established how to handle audio on a basic level inside Unity, let’s look at handling audio in a real-world scenario. I guess there are two kinds of audio sources we will have to deal with regularly. One is environment audio that plays from objects in your scene constantly. Think of a bee moving around you. You would want to hear it buzzing around. Thus it makes sense to have the audio source directly attached to your prefab and have it looping as long as your scene runs.
Sounds that are not “fixed” to some object you will need to manage somehow. You maybe want to change the background music or play sounds when you click on a button in a menu. Now it would be annoying to add an Audio Source to every button in your menu. This is where we can create our own class to manage things.
Singletons
Manager classes are typically an implementation of the Singleton Pattern. A singleton pattern makes sure you only have one instance of the class. This instance takes care of everything regarding its purpose.
Singletons can be bad…
There are reasons Singletons are a terrible idea. And Robert Nystrom goes over them in significant detail in his book “Game Programming Patterns”. But as a beginner, as I assume you are, you can ignore that. But be aware of it and once you start bigger projects, read up on this!
So let’s look at implementing a generic Singleton inside Unity.
using UnityEngine;
public class GenericSingleton : MonoBehaviour
{
    public static GenericSingleton instance;
    void Awake(){
        if (instance == null){
            instance = this;
        }else{
            Destroy(gameObject);
        }
    }
    public void Log(){
        Debug.Log("This got called.");
    }
}
We create a class GenericSingleton and then as the first step declare a static variable named “instance” of type GenericSingleton. This can only exist once per scene. Once this object is created Awake() gets called. This is most likely the moment you press play, but could be during your game. Then we check if instance is already assigned. If that’s not the case, we choose this object as the instance. If an instance already exists, we destroy the current object which just tried to become the instance. The Log() method is just a simple class to show our next point:
Because our GenericSingleton class is public and static we can access it at all times from any other object in the scene:
using UnityEngine;
public class Caller : MonoBehaviour
{
    // Update is called once per frame
    void Update()
    {
        if(Input.GetKey(KeyCode.A)){
            Singleton.instance.Log();
        }
    }
}
This is how to set up a basic singleton.
So how can we use this to manage Audio in our scene?
using UnityEngine;
using UnityEngine.Audio;

public class AudioManager : MonoBehaviour
{
    public static AudioManager Instance;

    public AudioSource Music;
    public AudioSource Sfx;

    void Awake(){
        if (Instance == null){
            Instance = this;
        }else{
            Destroy(gameObject);
        }

        Music = this.gameObject.AddComponent<AudioSource>();
        Sfx = this.gameObject.AddComponent<AudioSource>();
    }

    public void PlayMusic(AudioClip musicClip){
        Music.clip = musicClip;
        Music.Play();
        Music.loop = true;
    }

    public void PlaySFX(AudioClip sfxClip){
        Sfx.PlayOneShot(sfxClip);
    }
}In the PlayMusic() method we set the music clip and then use the Play() function to play the clip.
In the PlaySFX() method we use the PlayOneShot() method. The difference between the two is, that we can fire multiple sounds when using PlayOneShot(). On the other hand we can make use of the loop feature, when having a dedicated Audio Source for an Audio Clip.
So how do we call this?
using UnityEngine;

public class Caller1 : MonoBehaviour
{
    public AudioClip SoundFx;

    private void Update(){
        if(Input.GetKeyDown(KeyCode.A)){
            AudioManager.Instance.PlaySFX(SoundFx);
        }
    }
}
This pretty much straightforward, as we just call the function on the Audio Manager. The only thing you have to note, that we store the Audio Clip on the calling class. The manager is just responsible for playing the Audio. Which Audio clip to play is in the object’s responsibility that is calling the Manager.
Audio Visualization
Audio Visualization is a typical playing field in generative design. Unity offers the tools to create audio visualizations too. This typically involves splitting up the audio Spectrum (about 20-20k Hz) into buckets and then visualizing the volume of these buckets. Unity offers the method GetSpectrumData(), which can be called either from an AudioSource component or the AudioListener component.
float[] samples = new float[64];
audioSource.GetSpectrumData(samples, 0, FFTWindow.BlackmanHarris);
GetSpectrumData returns something, but the syntax is slightly strange. You pass it an array which has to be based on powers of 2 and has to be between 64 and 8192 in size. It will then return the filled array without you having to assign it. It takes two other parameters. Channel and window. Channel is referencing the audio channel, left, right or the average of both. Passing 0 will use the average. The FFTWindow is referring to the Fast Fourrier Transform algorithm used to separate the spectrum into pieces. The more complex the algorithm, the higher the cost on the CPU. But you will also get a more accurate result. You can check the Unity documentation for all your options. BlackmanHarris is the most complex variant available.
The most simple thing we could do is place a bunch of cubes on a line and scale them based on the read value each frame.
AudioVisualizeSimple.cs
But here we can already see a bunch of issues. It is jumpy, which isn’t nice to behold. The range of these jumps is also very harsh. The GetSpectrumData() method is reading in all those spikes that happen in the audio data and that doesn’t translate all that well into visuals. The approaches typically taken in audio visualization are converting the data into the decibel format and applying a buffer. The decibel format is using a logarithmic scale and will flatten those spikes. The buffer will allow the values to jump immediately adjust to high values but then fall slowly.
Let us look at the conversion to decibels first:
float decibels = 10 * Mathf.Log10(Mathf.Abs(samples[i]) * samples[i]);This really is an abbreviation for a slightly longer formula which would need some kind of reference value, which we don’t have. Thus we use the samples squared. In return we will get values in between 0 and about -130. If the sampled values become too low, we will get “bad” values which result in NaN values. NaN means “Not a number” and we need to check for this later.
if (!float.IsNaN(decibels)){
    //CODE
    }
But now all our values align in the wrong direction, as almost no sound results in a large negative number and loud values return almost zero. We can remap these values. Remapping values is superbly useful, and Processing for example has this integrated already. Unity sadly does not though. But there are a lot of smart users out there and some discussed several options to solve this on the Unity Forums. We will convert the solution provided by “kru” into a method:
private float Remap(float value, float aLow, float aHigh, float bLow, float bHigh){
        float aValue;
        float normal = Mathf.InverseLerp(aLow, aHigh, value);
        float bValue = Mathf.Lerp(bLow, bHigh, normal);
        return bValue;
        }
We can now remap our values to become more useful positive values like this:
cuboidAray[i].transform.localScale = new Vector3(1, Remap(-120, 0, decibelArray[i], 0, 10), 1);You might wonder where the decibelsArray[] comes from. We use this for our simple buffering algorithm. For this one we create an equally sized float[] array called decibelsArray. Right after the conversion from the sampling values to decibels, we check if the currently sampled value is larger than the stored value inside the decibelsArray. If it is we replace it, if it isn’t we decrease the value stored inside the decibelsArray. This way we get the spikes, but they won’t jump back down the next frame immediately, but will slowly come down.
This already looks way better, but we can see some interesting effects still. The values in the bass are way higher than the values at the rest of the spectrum. This has to do with how we as humans perceive sound. We don’t hear the spectrum linearly, but perception falls off in the lows and the highs. Thus the values in the lows need to be technically higher to compensate the irregularities of our ears. We could get rid of this phenomenon by weighting the curve by a dB(a) scale, but as we are interested in visuals a little dynamic can’t hurt!
But having all this placed along a line makes sense for audio engineers, but doesn’t make for an interesting visual result. Let us place our cubes on a circle and scale outward.
Vector3 position = new Vector3(Mathf.Sin(angle), 0, Mathf.Cos(angle)) * radius;
cuboidAray[i] = Instantiate(prefab, position, Quaternion.identity);
cuboidAray[i].transform.LookAt(Vector3.zero);
cuboidAray[i].transform.Rotate(Vector3.left, 90);
But now we still get this rather technical result, lets play with the distribution of our cuboids more:
float angle = ((float) 360 / samples.Length) * i;This way we spread all our values symmetrically but not linearly around the circle and get some interesting results. Lets also add some color.