P1 - SciFi Corridor
In this project, we will create an infinite “cliche” Sci-Fi corridor which will be pseudo-randomly put together with each corridor segment. With this project we will tie together a lot of the things we looked at in this book earlier. We will write a corridor randomizer which will use modular assets to make random numbers useful. We look briefly at how I thought out the modular corridor and how I went about creating the assets using Blender and Substance Painter. We will also again look into creating and triggering Animations and audio clips. Finally, we will add Post-Processing Effects to the mix to make our scene shine even more. And you can download all the assets, so you can recreate this and hopefully make it your own.
For simplicities’ sake, I will describe the project as something I did in a very straight manner. That is not the case though. I worked with rough assets first and incrementally improved things.
Modular concept
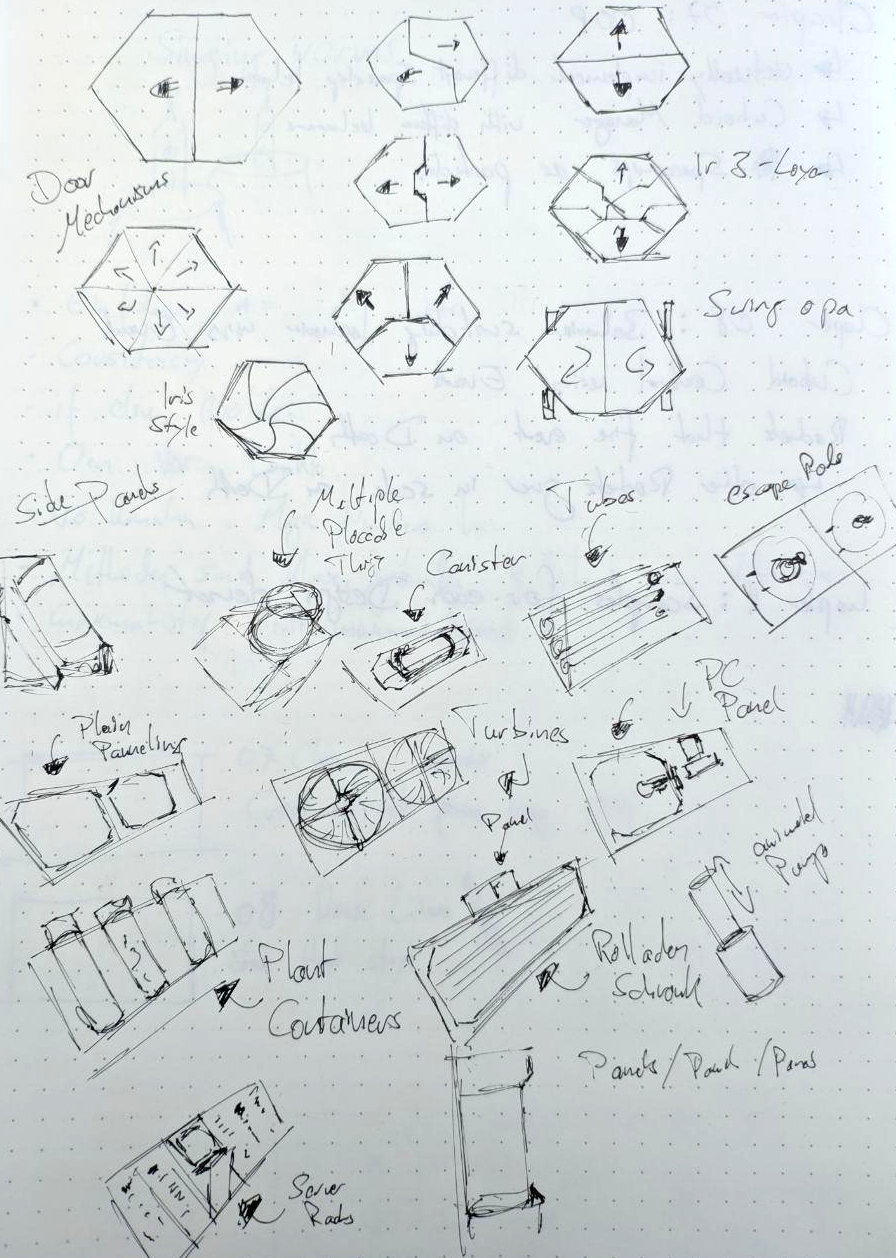
Sketches
Earlier in this book we had a brief discussion about randomness and its usefulness. In this chapter we will use randomness together with modular assets to create variation in a space corridor while still trying to maintain a certain amount of artistic control. These techniques are used quite a lot throughout video games and are sometimes combined with fixed areas. The “Diablo” games by Blizzard famously make use of such a system. “Endless Dungeon” by Amplitude Studios is also a marvellous example of this technique.
Modularity means we use assets of a certain pre-defined size. These will then nicely work together with the other assets of the same collection. This simplifies world building a lot. While putting your level together you can use snapping and you can be sure that certain elements will just fit together. You will not have to deal with gaps between the assets and so on. It also means you know certain sizes of objects and thus can piece them together at runtime through code.
In our project we will have four corridor pieces in the scene. They will move down one direction while we lock the camera in the center. We will move the camera only in X and Y. Once a module reaches a certain point behind the camera, it will destroy itself. Yet on the other end of the corridor a new module will pop into existence. We will supply this instantiation process with some rules. We don’t want it to be completely random. We will e.g. choose from a bunch of patterns in which to place the side panels.
Modular Asset Creation
For this project I started out with some research on space corridors. I went out and gathered reference. I looked at some images of real spaceships and satellites provided by “NASA” and “ESA”. But I also checked websites like “Artstation” and “Pinterest”. Here I found more artistic and more futuristic designs. Once I had a good idea of how my corridor should look like, I went straight into Blender.
Blender is a free open source 3D content creation suite. It is astonishingly capable and since a few years is up to par with commercial software like Maya or 3ds Max.
You can grab it at blender.org.
Here I decided on the height, width and length of the basic corridor shape. You can put a reference human model in there or just put a cube. But anything that kind of resembles human size is a great way to help yourself get a feeling of the space. You can also try what different camera angles can do for you.
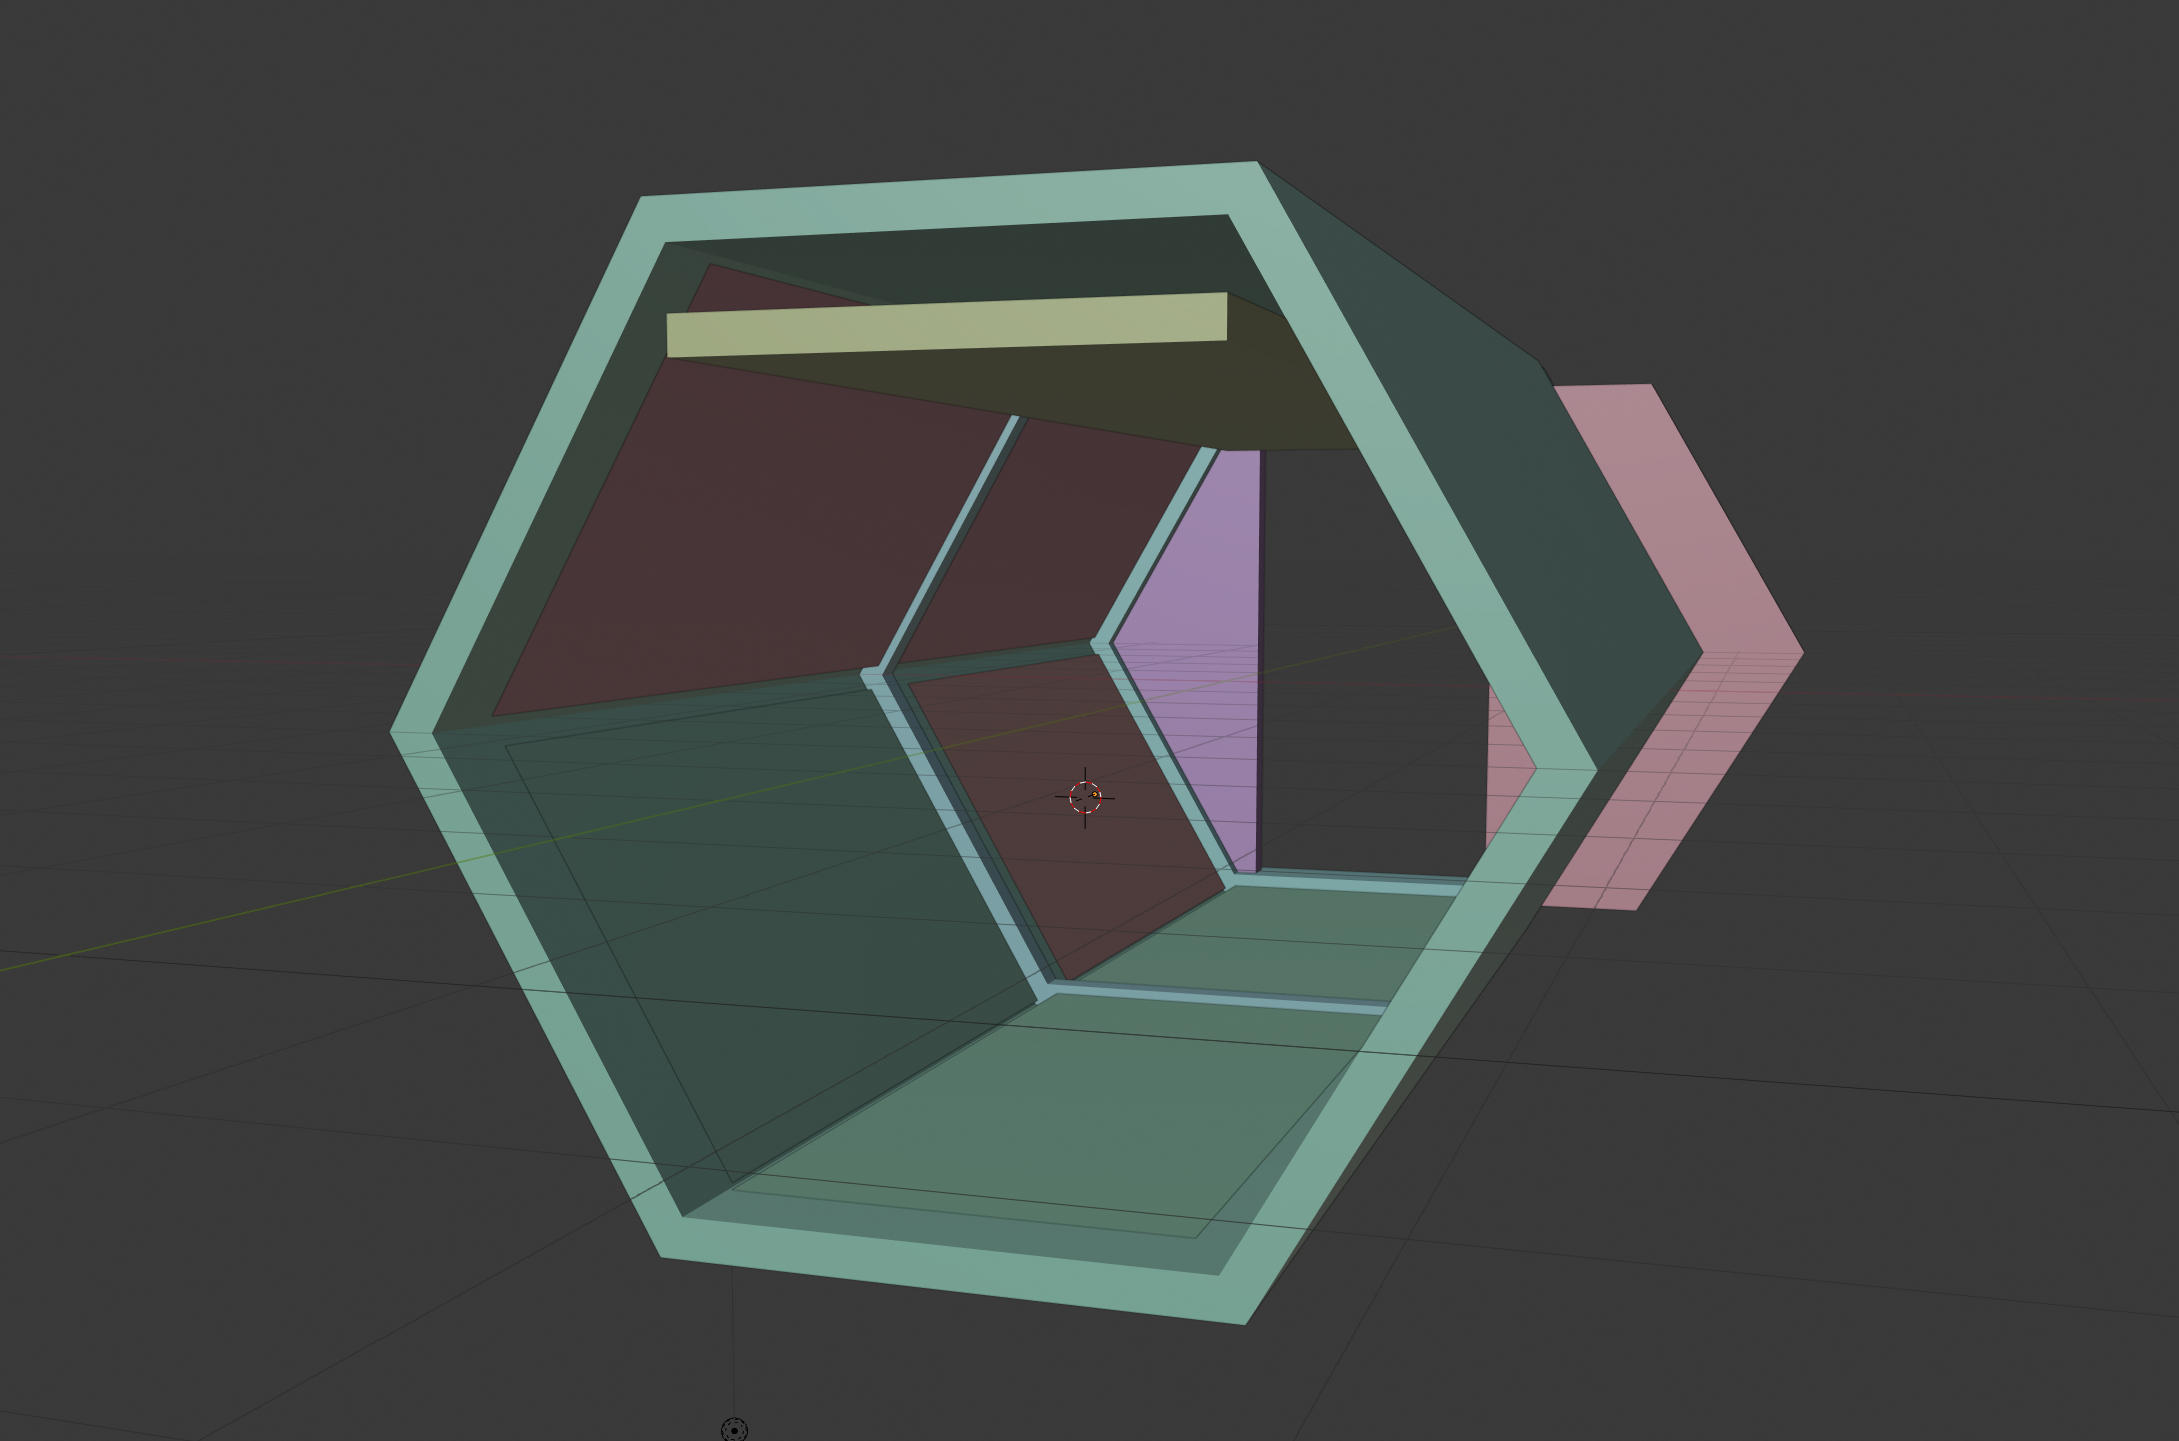
Sketches
I then started blocking out some basic shapes for the modules inside the corridor, like panels on the walls and floor and the basic depth of a door element. Once I was happy with the basic shapes, I was ready to start modeling.
I always grabbed the basic shape of the module and placed it into the center of the world as a reference. I then duplicated it and again started laying out the module using basic shapes. Then I slowly started working out the details.
Asset Creation
With the model done I went ahead created some lazy UVs. UVs are texture coordinates that tell the software how to wrap an 2D image around a 3D object. I could get away with lazy UVs as I was headed straight into Substance Painter. As exchange format towards Substance Painter and later Unity, we will use the *.fbx format.
Texturing the assets
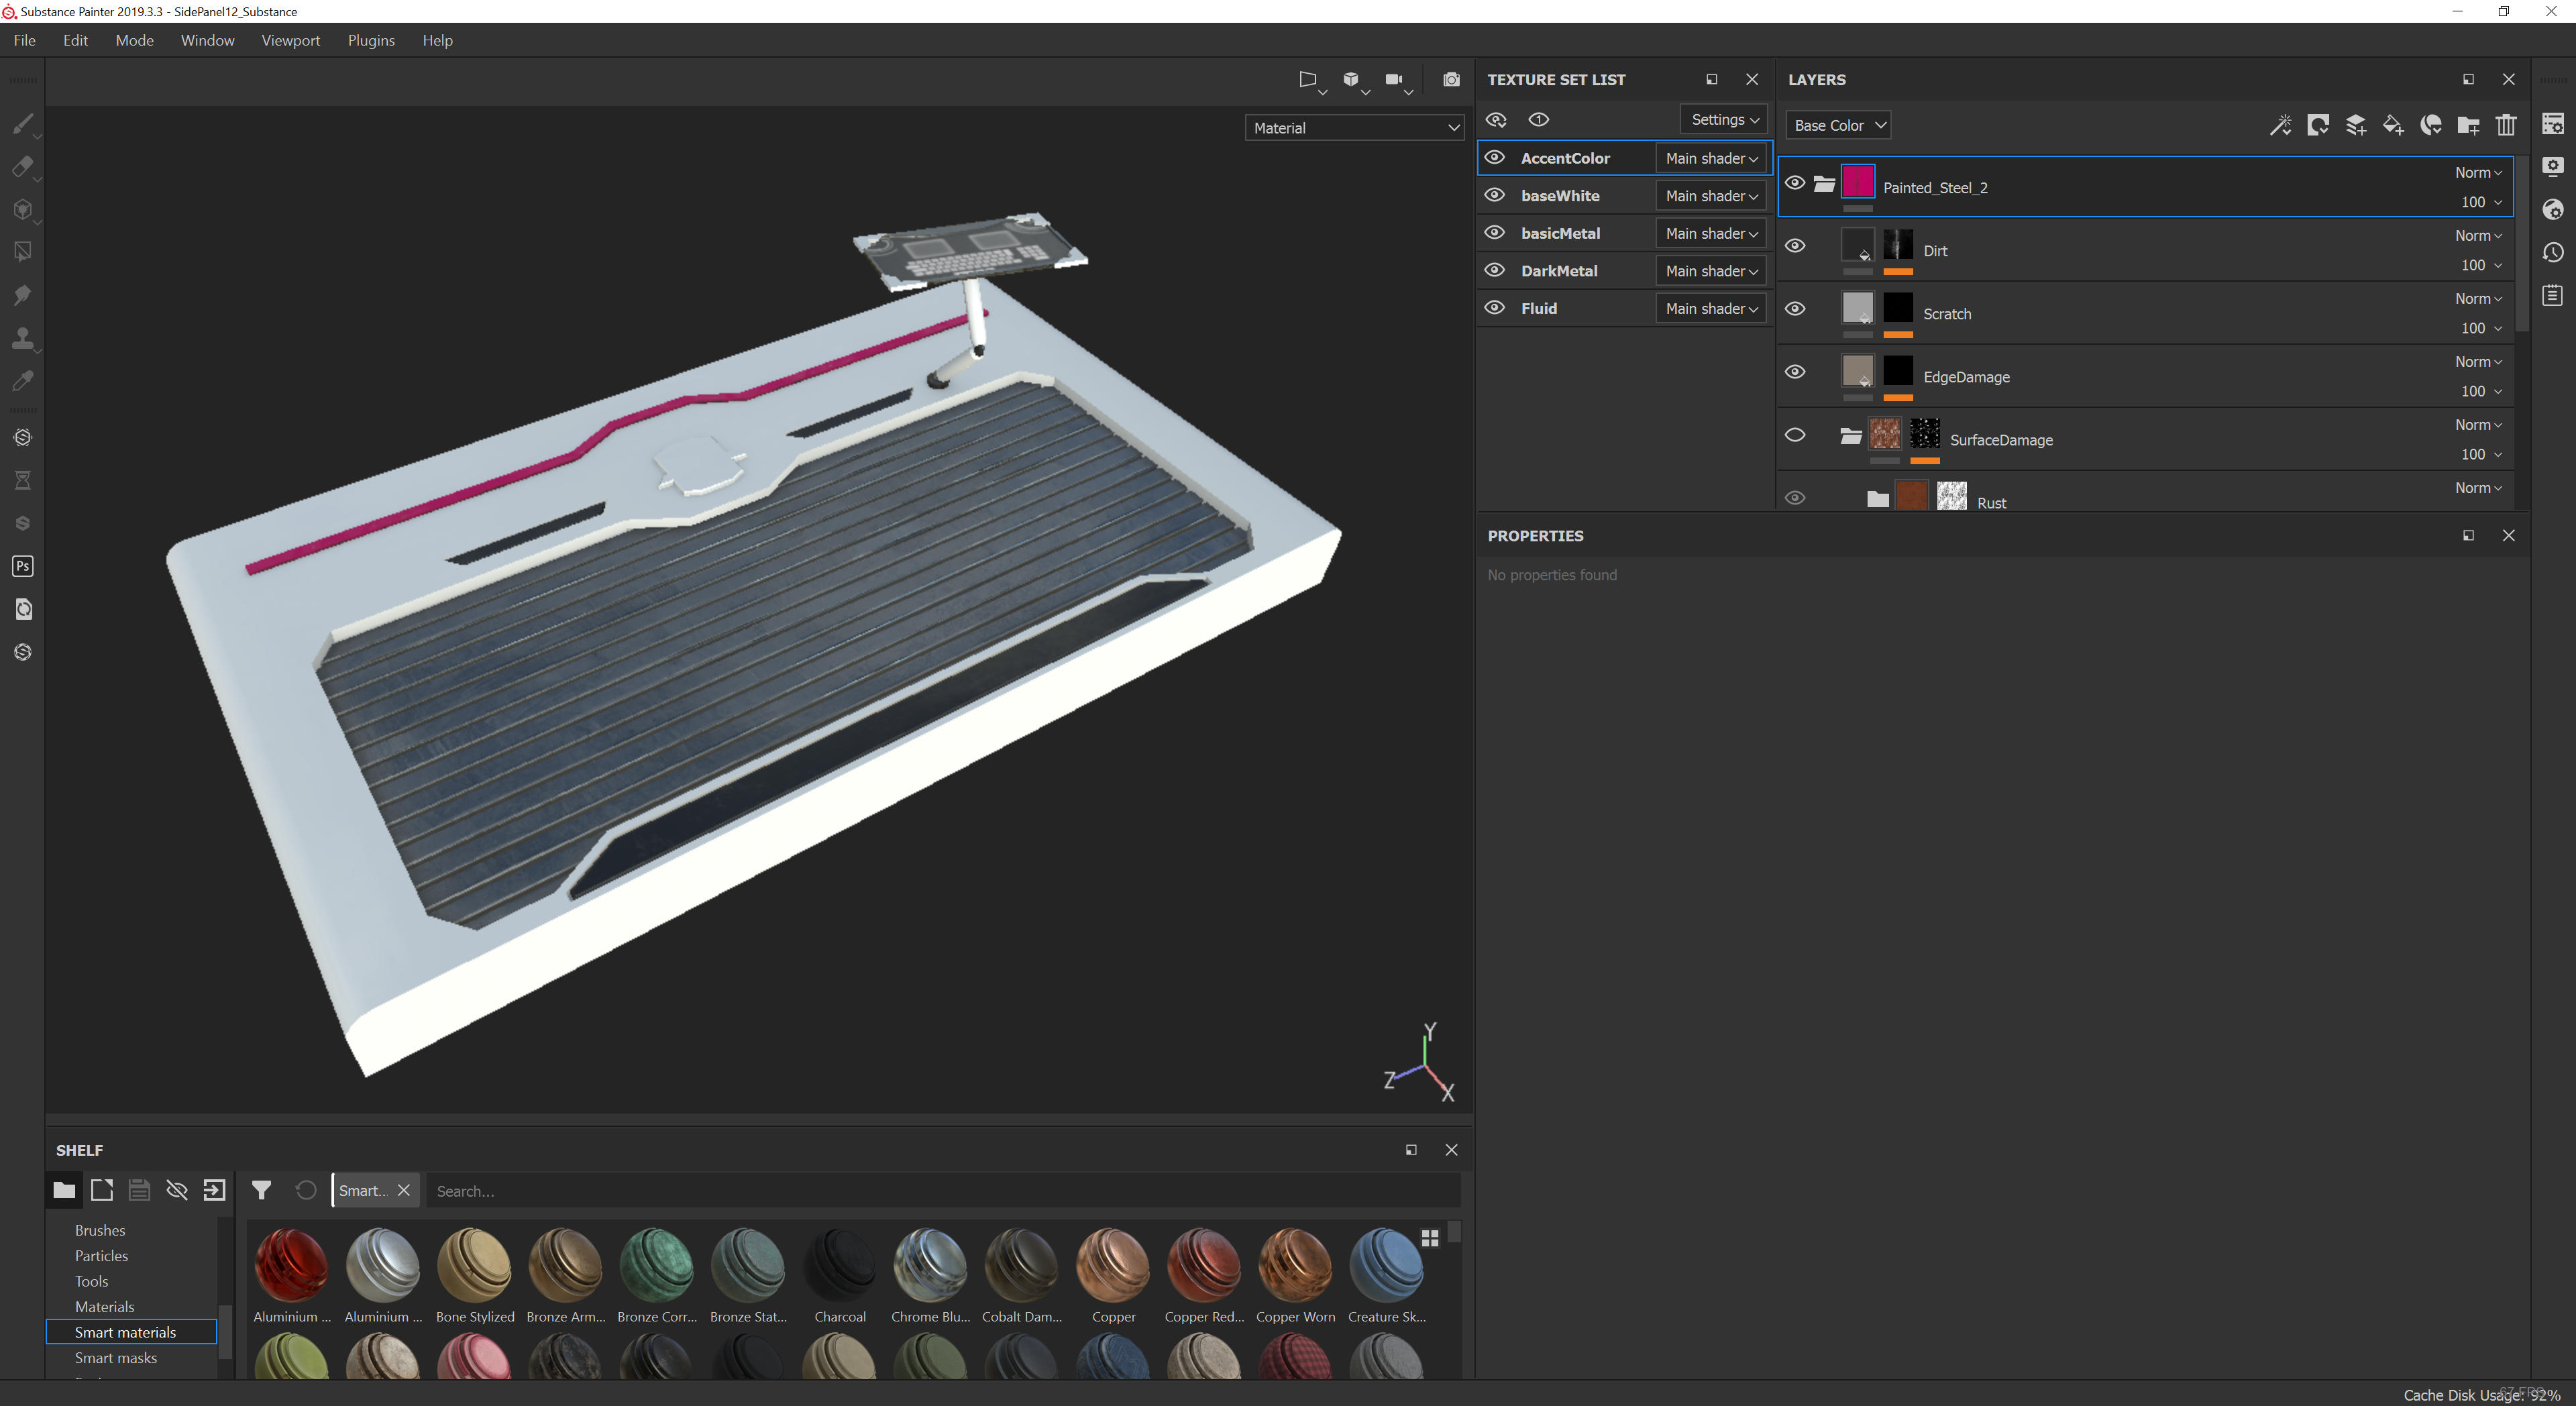
Texturing in Substance Painter
I did the texturing of my assets inside “Substance Painter”. Substance Painter is a procedural texture painting software and together with Quixel the industry standard. It allows you to “bake” maps that will represent some properties of a surface. E.g. the direction a surface is facing. Substance Painter will then later pick up on these values to create procedural materials which result in a realistic look.
It also features a bunch of pre-built smart materials. These are presets provided by Substance Painter, which we can easily drag and drop onto a surface. The procedural algorithms will then pick up on the previously baked maps and this will look kinda nice out of the box. Of course(!) these should not be your final textures in bigger projects. But they are a brilliant starting point and I used them a lot, as they totally suffice for our little project here.
Corridor Movement Code
With all our Assets set up, we can finally jump into the code. The script that initializes it all is the SciFiManager. Which really is a euphemism as it really doesn’t do that much.
SciFiManager.cs
Here we have variables for the movement speed of the corridor, we also define the length of our corridors and grab the baseCorridor prefab. Based on these values we create four positions along the Z-Axis and on each we Instantiate the baseCorridor prefab. Code-wise this is a dead end, we call nothing else. Thus let us look at this Corridor Prefab.
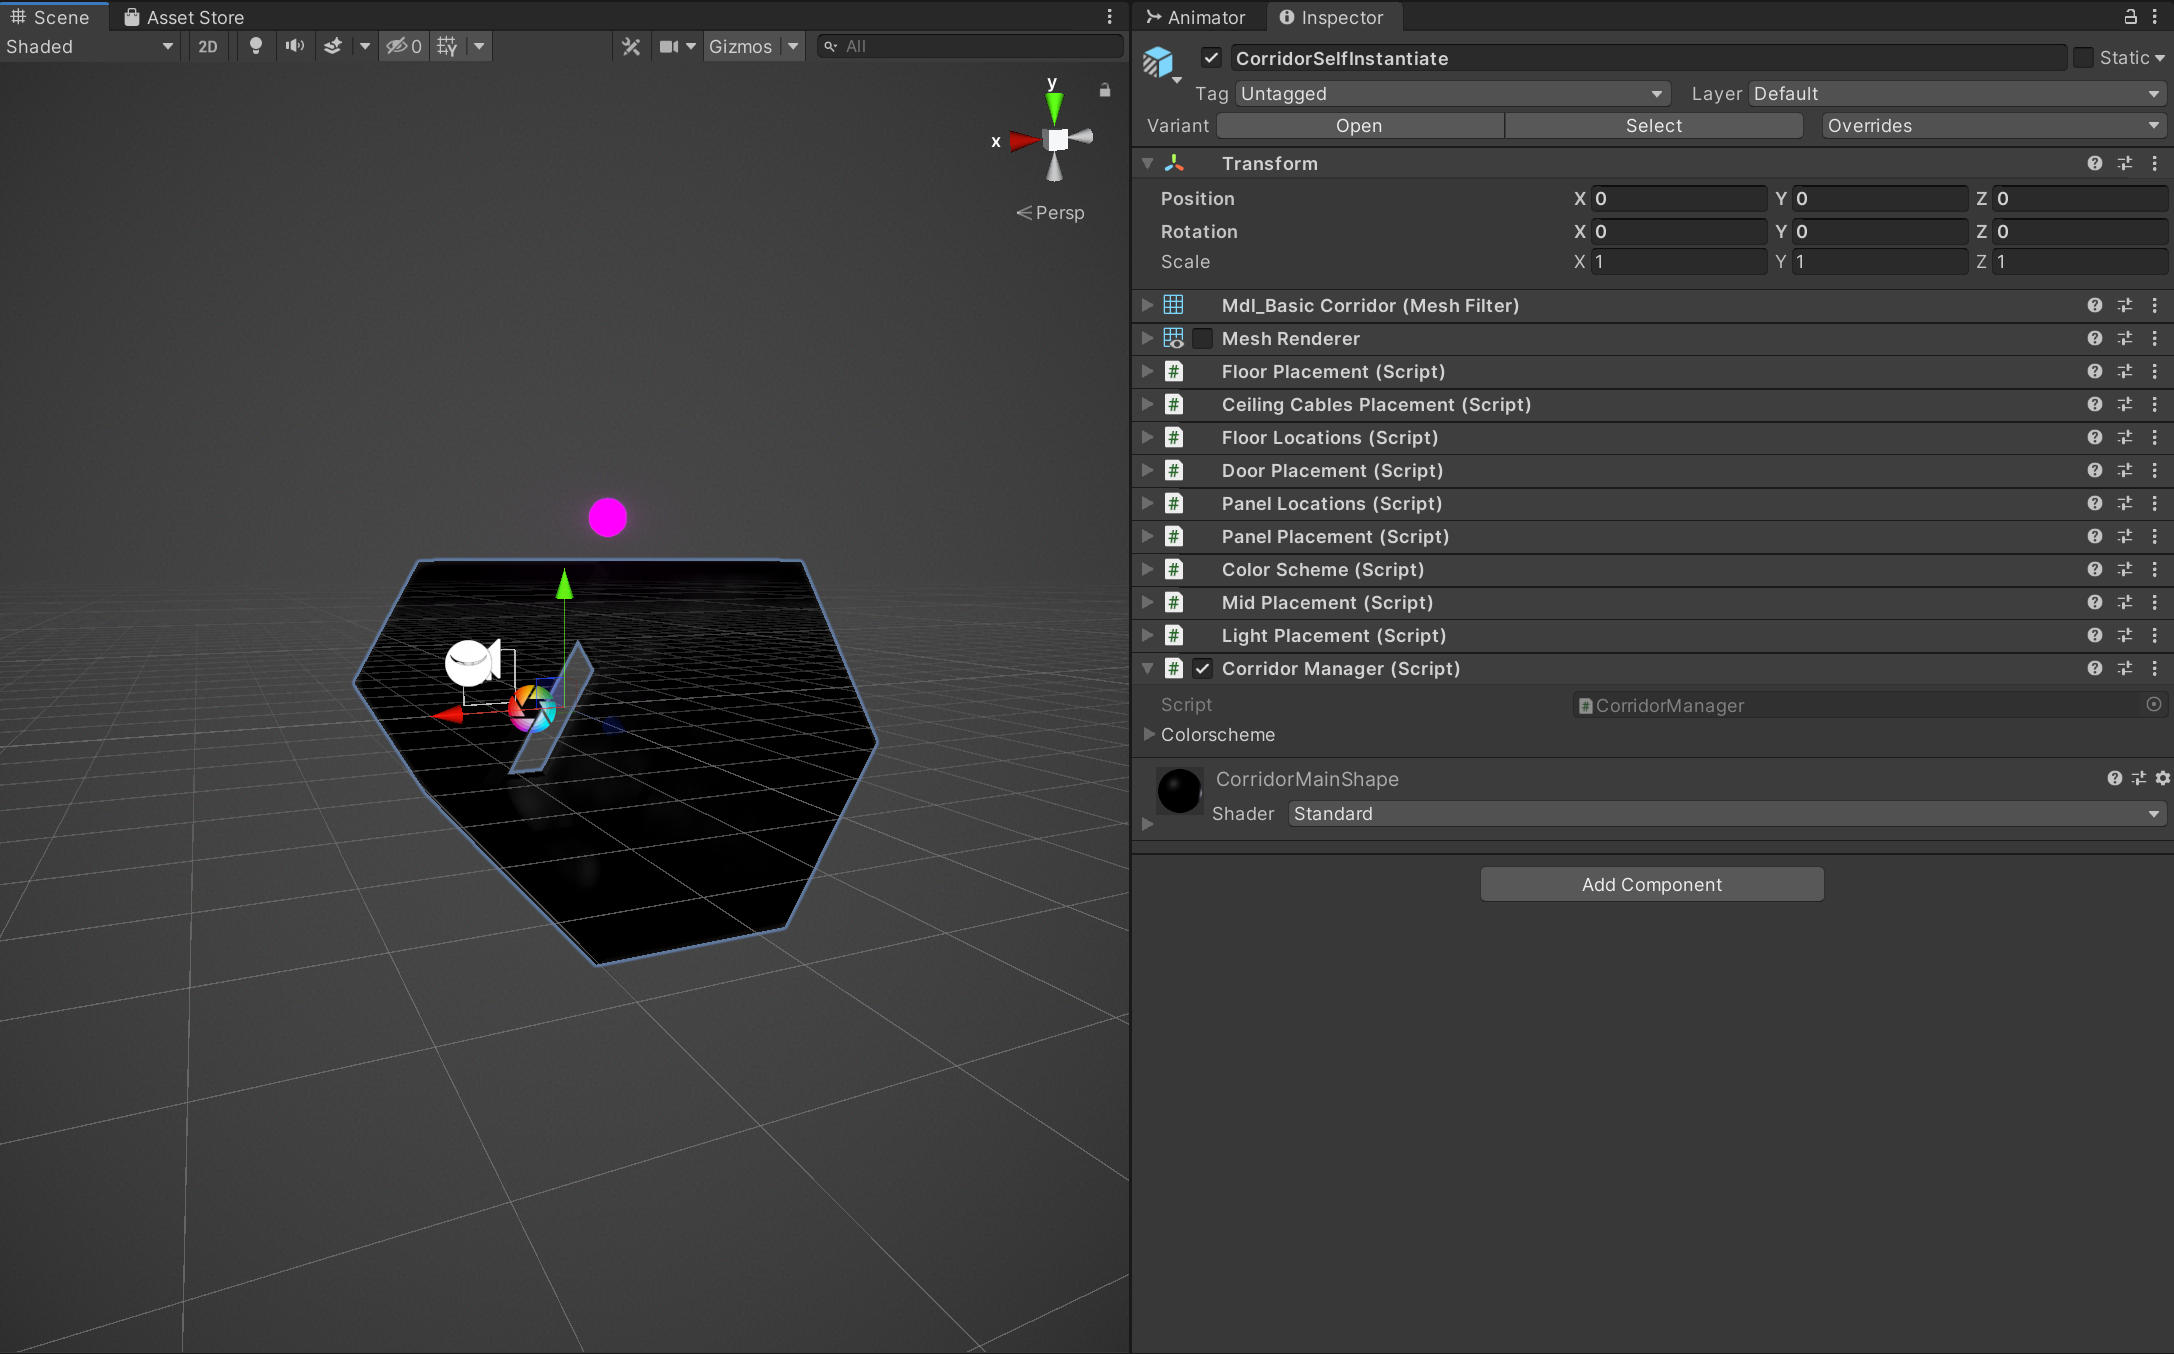
Corridor Prfab
As you can see, the Corridor Prefab has a lot of scripts attached to it. Each of these places a specific element inside the base corridor. The moment we create the corridor we call all these scripts from the CorridorManager. It first grabs some references to other objects, like our sciFiManger and the colorScheme component. The colorScheme returns an array of colors. Instead of being random, they follow some rules. The returned colors will choose from being monochromatic, analogous, complimentary or triadic.
CorridorManager.cs
The CorridorManager hands the color scheme to all the placement components that take in colors as a parameter. These placement components then take care of placing the objects inside the corridor themselves. Before we look at one of those, let us explore the CorridorManager more.
It is also responsible for the movement of the corridors. This is happening in the Update() method.
private void moveCorridor()
{
    transform.position += Time.deltaTime * _sciFiManager.movementSpeed * Vector3.forward;
}
The movement is as simple as it gets. We move forward determined by the speed set in the sciFiManager and also multiply it by deltaTime to make things move in a constant speed independent of frame rate.
In Update() we also call a method called RebirthAndSelfDestruct. In this one we check if a certain position has been passed. If that is the case, we pass this position minus the length of four corridors to our SciFiManager. The SciFiManager will then create a new corridor at the given position.
private void RebirthAndSelfDestruct()
{
    if (transform.position.z >= 12)
    {
        _sciFiManager.createCorridor(transform.position - Vector3.forward * 32);
        Destroy(this.gameObject);
    }
}
We will also Destroy() the current corridor and everything inside it, as it is no longer needed. If you don’t destroy it, you will end up with hundreds or thousands of corridors and at some point your application will grind to a halt.
Placement
PanelPlacement.cs
So now let’s look at the PanelPlacement script. It is probably the most complex of the placement scripts, thus if you get this one, you will easily understand the rest of them.
It all starts with an array of GameObjects called Panels. Here we add all the possible GameObjects or panels we want to add to our walls. We also create a reference variable for the PanelLocations component. It only contains an Array of GameObjects which will just be “empty” GameObjects. We use these to define the positions where to instantiate our panels.
We could calculate these positions ourself, but I found it to be a more artistic way to be able so shift the locations around in the Editor until they satisfied me. As our Assets are not only modular, this adds some artistic leeway.
We also create a int[] array and call the RandomArray() method. In it we have a bunch of patterns defined and pick one of those based on a random number. These Patterns represent positions inside the corridor. Using this approach we avoid just randomly filling the place with panels. As Spaceships are something man-made they typically adhere to some kind of order. You surely could define additional patterns or go completely random.
We then pass the created pattern to the GenerateSymmetryPatternOne() method to not just reuse the same four panels. We choose four different panels from the range of Panels. Back in placePanels() we instantiate these. We also run the ApplyColorScheme() method if it is present on the instantiated panel. This will color elements which are capable of having their color adjusted based on the Color scheme we defined for the whole corridor earlier. To simplify this, it only checks for emissive materials, but you could define other materials as well if you wanted to do so.
ApplyColorSchemeToSelf.cs
As mentioned earlier, the other placement scripts are at least as easy as this one.
The camera movement is another interesting thing we can look at. We could have our camera static at the center of the corridor, but that’s rather uninteresting. Thus we will make use of the noise methods we discussed earlier. We will have two different noise movement components. One for an empty game object that is slightly ahead of our camera and one for the camera itself.
CameraMovement.cs
The LookAtMovement script is almost the same, it just adds a distanceFromCamera variable. Adjusting this will affect how extreme the camera movements are.
The last script in the project is the StateManager. It handles user Input and can toggle certain states. Right now I only implement a “danger” level. This will enable a probability to spawn moving lights inside the scene. Using these states you could also manage which kinds of color schemes can exist. This would be the basis for customizing the scene at runtime.
StateManager.cs
Lighting
So let’s talk a bit about the lighting setup in this project. As everything is moving in the scene, we can’t really use indirect lighting. There is nothing we can bake. Thus all our lights are real-time lights. A placement script instantiates two key light sources in the corridor’s ceiling. I set these up to draw soft shadows. You can increase performance if you set these as hard shadows. Completely disabling shadows will make your scene look bland. It would also cause your light to shine through geometry and also light the next corridor. Thus we definitely need those shadows.
If the danger level I mentioned earlier is enabled, there is also a chance to instantiate rotating spotlights at the end of each corridor. These also use shadows.
Besides these instantiated lights, there are also prefabs which contain light sources. These are just here for effect, thus if you need to bring up the performance, delete those additional lights.
If you bring in the raw assets, you also find that there are some shadow artifacts. These happen because everything we do in 3D is fake. By default, the backsides of things don’t cast shadows. To enable this, we need to go through our geometrie and enable “Two-Sided-Lighting” on the MeshRenderer component.
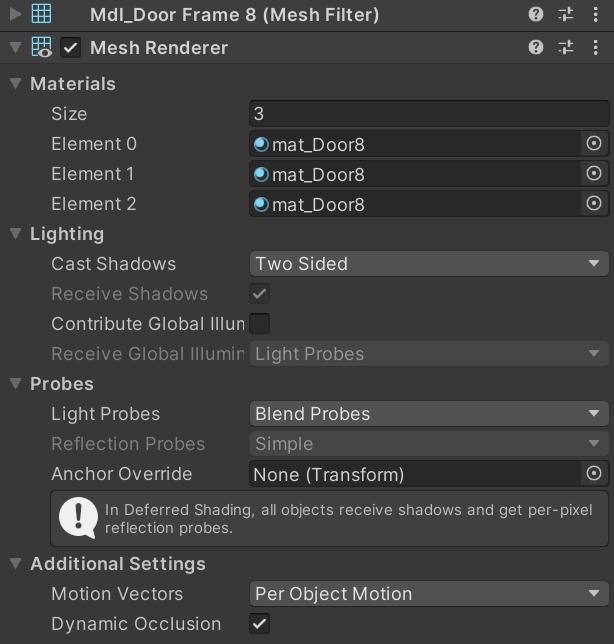
TwoSided Renderer
We also would like to get some shiny reflections onto our metals. Thus we need to add a “Reflection Probe” to our scene. This sadly also has to be handled in real time and can really draw from the performance you get out of your scene. If your computer is struggling with this, try reducing the resolution of the Reflection Probe. You can also set it to not update all faces at once, but this will lead to visible jumps in the reflections. Worst case, you can always disable it.
Animations
To complete the setup of this sketch, we need to animate the doors. They will need to open and close automatically as soon as the camera comes near. To detect this, we will use triggers. Thus we need to add a Box Collider to each Door Prefab. We will also need to add one to our camera and check the Is Trigger checkbox.

Trigger is checked
When creating your colliders their size will affect when the doors will open and close. Thus you should have the colliders on the doors extend more towards the camera.
Now both, the camera and our doors are set up to use the rigid body system. We can now write a script which will check for an intersection of both and then call an animation.
OpenCloseDoors.cs
Here you can see I set this script up to be flexible. We grab an array of animations from the current Gameobject - our door. Thus we could vary the number of animations, if we wanted to do so. We then create two Unity Event methods. OnTriggerEnter() and OnTriggerExit(). We need not call these in Update() or anything. They will be called by the Gameobject as soon as any object that is a trigger enters the collider. Here our camera.
Inside these methods we just call the Play() method and pass the state we want to play.
Post Processing
Last, I also added some post processing effects. Post processing is always a wonderful option to add some mood to the entire scene. In Unity it also enables some useful features like Motion Blur, Ambient Occlusion and Screen Space Reflections. They all will help with reducing the artificial computer generated look. Though getting perfect realism depends on the quality of the assets and not some magic effects. The provided ones are not up to par with that.
Post processing can also help blur some issues you have in your scene. Grain for example will reduce some sharpness of your scene, breaking up perfectly rendered edges. Adding a Vignette will help focus the view into the center of the scene as it reduces the brightness at the borders of the screen. Chromatic aberration fakes some irregularities of real world lenses. Used lightly, it can help create a more realistic image.
Another Game Engine favorite is Bloom, which will create some kind of halo or glow around bright lights. It is supposed to create more realism, though I am still waiting for the first game engine to implement great looking bloom, yet again, used lightly it can help.
Deploy as Application
The last thing we want to do is package this thing up as an application. This standalone version can then be sent to friends and family and even runs with better performance.
To start the deploy process, go to File--->Build Settings.
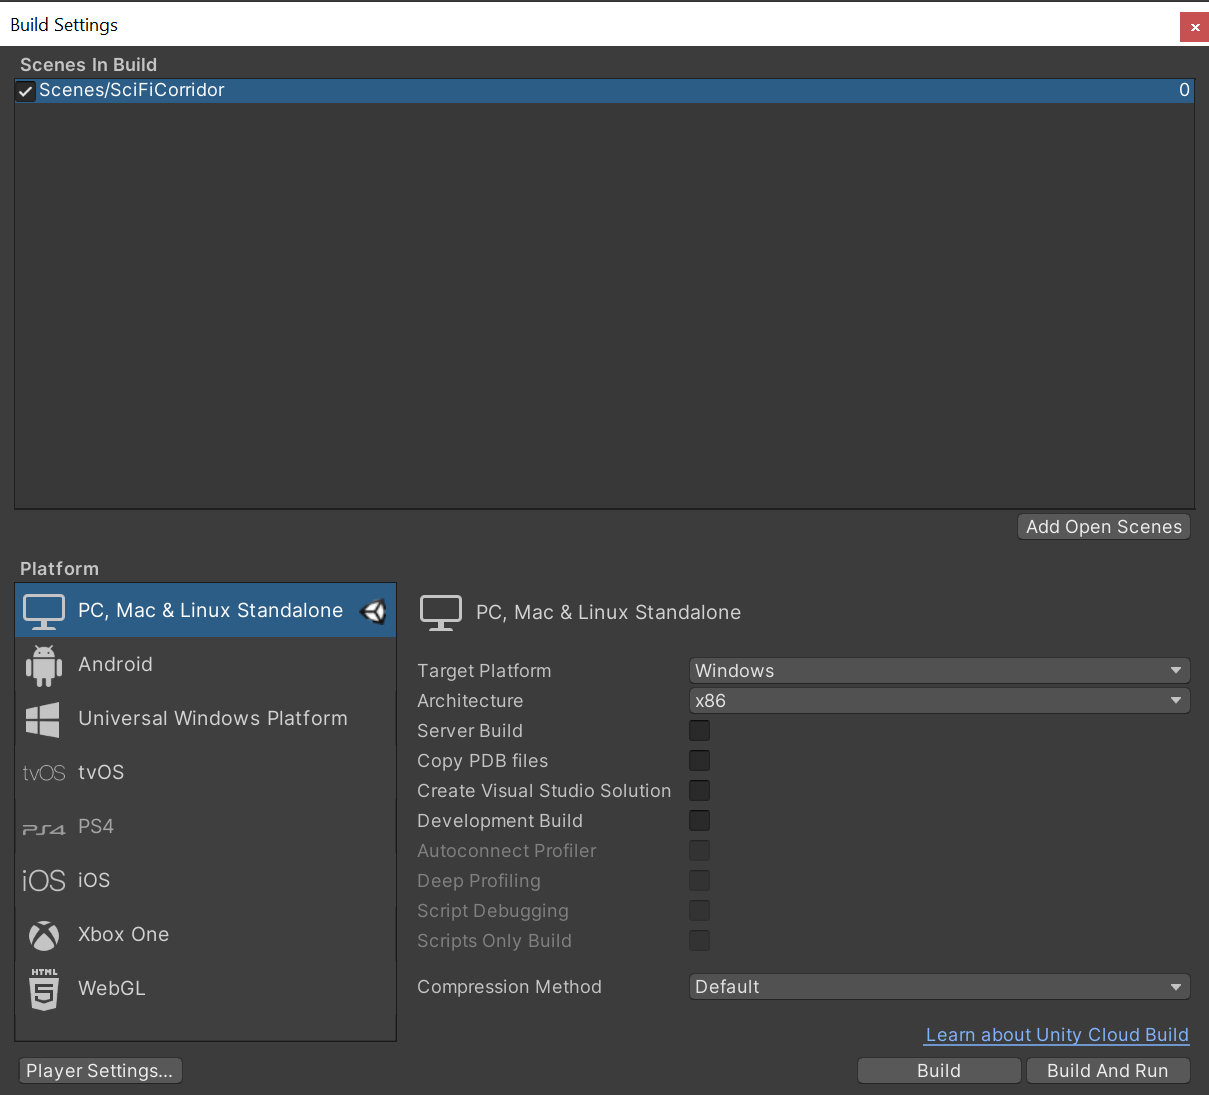
Build Settings
Here we have to add the Scenes we want to add to our deploy, it’s just one in this case. We can also choose the device we want to deploy to. We will go for the standard “PC, Mac, Linux” variant. Typically, you should be able to leave all the other settings as is. Then choose “Build” or “Build and Run”. Build and Run will directly run the generated Program. Choose a Folder to store the application in and Unity will take some time to generate the application.
If you want to share your work, you can pack up the whole folder and zip it.
Other Devices
Additional Resources
Assets
The assets provided are not really “production ready”. Modeling and UVs are lazy. I could get away with this as it works for the project. If you plan to do more complex work, you probably need better optimized assets.
Reference
Software
Tutorials
Grant Abbit Blender Tutorials (free) Hard Surface Modeling in Blender (paid)